The Dellorto DHLA is, in the words of people who have owned both, either a Weber DCOE with better ideas or a Weber DCOE with Italian complexity, depending on which particular afternoon they are reflecting on. Both assessments contain truth. The DHLA shares the DCOE’s sidedraught twin-choke architecture and constant-flow racing carburettor character, and on an engine that suits it the results are indistinguishable in practice. What differs is the detail: the Dellorto has an externally accessible idle mixture screw, built-in vacuum ports for manometer balancing, and an externally adjustable accelerator pump. These are genuinely useful advantages over the Weber. What it also has is slightly scarcer parts, a more expensive service kit, and a somewhat smaller community of specialists who truly understand it.
The DHLA appeared on Alfa Romeos, Lotus twin-cams, and a variety of kit cars and competition vehicles, and has found its way onto performance-modified British classics in significant numbers. Its suitability for six-cylinder applications has made it a particularly popular choice for Triumph GT6 and TR6 performance builds: three DHLAs on a six-cylinder, one per pair of cylinders, is a setup that sounds theatrical, delivers results, and requires the mechanical sympathy and patience that theatrical machinery always demands. This is a guide for the owner who has made that choice, or is considering it, and wants to understand what they are getting into before the invoice arrives.
What the DHLA is and where it lives
The DHLA designation covers the main family of Dellorto sidedraught twin-choke carburettors used on four-wheel vehicles. Available in 40 and 45 barrel diameters, the sizing convention is identical to the Weber DCOE: the number is the barrel diameter in millimetres, not the venturi size. A 40 DHLA is the natural choice for most road and mild performance applications. A 45 DHLA is appropriate for larger engines or those intended for competition use where high-rpm power takes priority over low-speed tractability.
The DRLA is a related Dellorto model with a different float chamber arrangement. Less common on British classics but occasionally encountered. The tuning principles are similar, the jetting specifications differ, and mixing DRLA and DHLA parts is a mistake that is worth specifically not making.
Where the DHLA was used on British classics: Lotus twin-cam engines received both DHLAs and Weber DCOEs apparently at random during various production periods, which tells you something useful about their interchangeability. Triumph GT6 performance builds have used triple DHLAs. Various TR6, Stag, and six-cylinder Triumph conversions have used DHLA pairs or triples. Any application where the Weber DCOE is used, the DHLA can substitute with equivalent jetting and results.
Three on a six: the triple DHLA experience
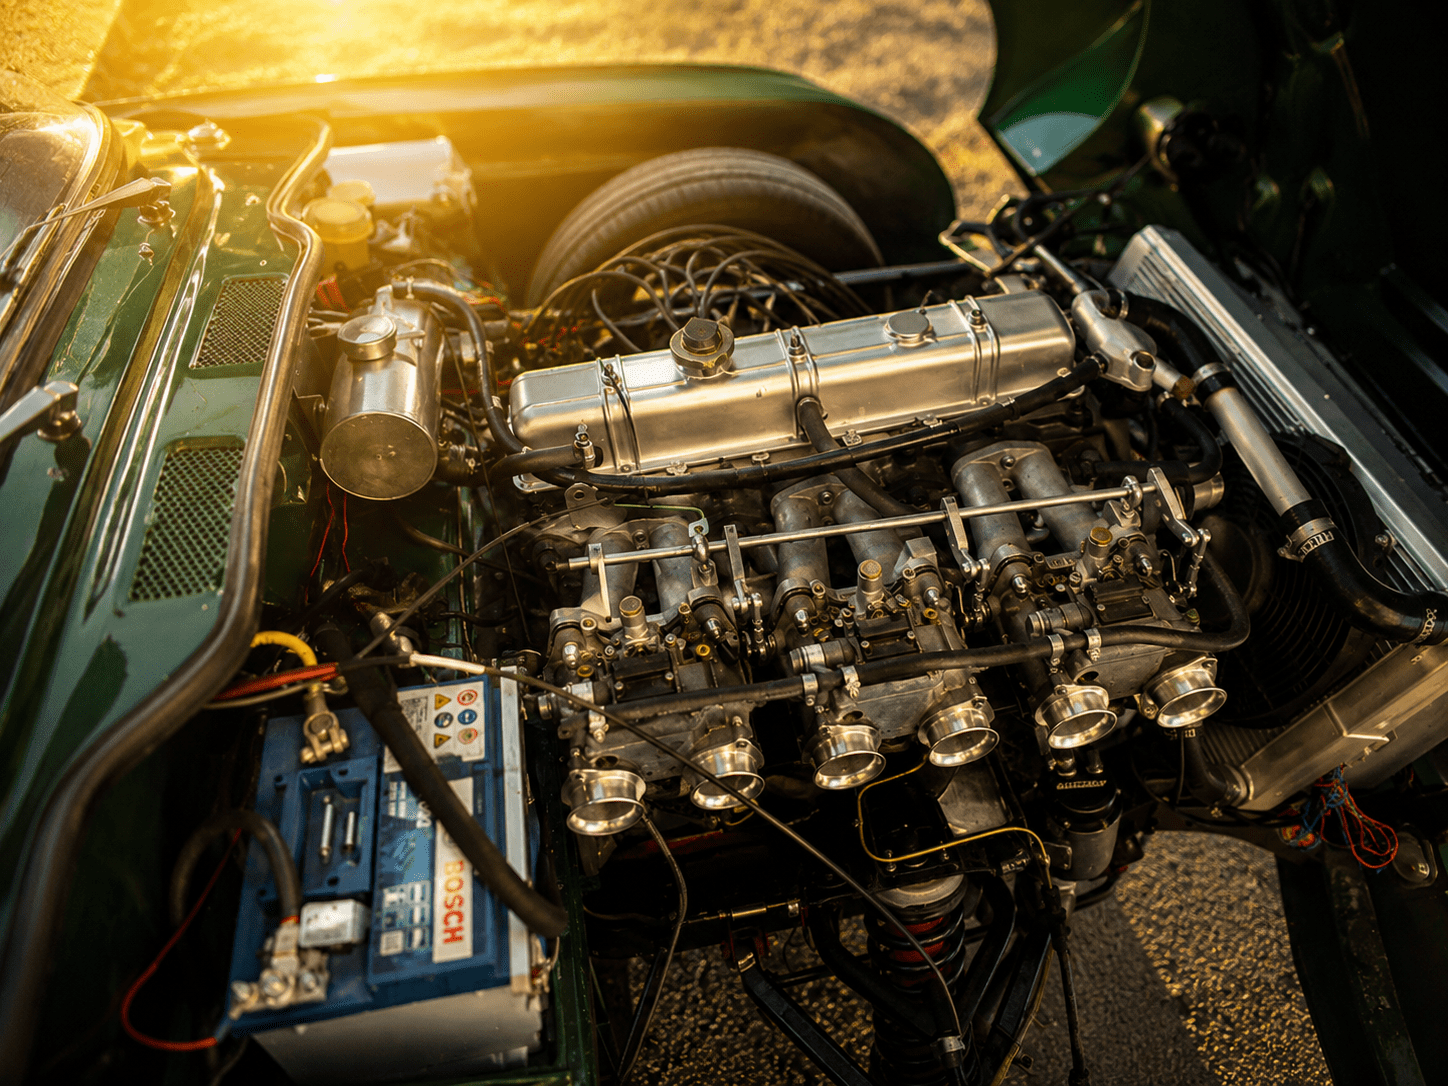
Three twin-choke carburettors on a six-cylinder engine gives you six barrels of twin-choke sidedraught induction, one per cylinder, with each carburettor feeding two adjacent cylinders. On a properly prepared six-cylinder engine with good cylinder head work, appropriate camshaft, and an inlet manifold designed to take advantage of induction pulse tuning, the result is exceptional mid-range torque combined with a top-end power delivery that makes the car substantially more exciting than it was before. On a less thoroughly prepared engine, the result can be a car that is harder to drive than before, makes more noise, and does not obviously go faster. The installation is only as good as the engine underneath it.
The induction noise from triple DHLAs at full throttle is, incidentally, something that no written description fully prepares you for. It is extraordinary. Whether it is pleasant or alarming depends on your disposition, your neighbours, and the speed at which you are travelling at the time. With the air filter trumpets fitted and a straight road ahead, it produces a sound that justifies, at least for a few moments, everything that was spent getting to that point.
The practical complications of a triple installation: the linkage connecting three carburettors must open all six butterflies simultaneously and progressively. Poor linkage geometry produces a setup where one carburettor opens ahead of the others, which means the engine runs on two or four cylinders at light throttle and six only at significant throttle openings. This feels like a flat spot, gets diagnosed as a jetting problem, and wastes time that should be spent on the linkage instead. Before jetting anything on a triple installation, confirm that all three carburettors open and close simultaneously by watching the throttle plates from each bell-mouth while an assistant operates the throttle. Slowly. With the engine off, obviously.
How the DHLA differs from the Weber DCOE: the practical advantages
Three specific design differences make the DHLA more practical than the Weber for the home tuner.
The idle mixture screw is external and easily accessible without tools, protruding from the carburettor body rather than being recessed. On the Weber DCOE, the mixture screws are recessed in the body and on some emission-equipped variants are sealed under tamper-proof caps that require removal before adjustment is possible. The Dellorto approach is simply better for anyone who adjusts their own carburettors, which should be everyone reading this guide.
The accelerator pump is externally adjustable via a nut and locknut on the pump rod, accessible without disassembly. To increase pump volume, adjust the nut to lengthen the pump stroke. To reduce it, shorten the stroke. On the Weber DCOE, altering the pump volume requires drilling the metering hole, which is effective but irreversible. The Dellorto approach is adjustable, reversible, and requires no drilling. For the owner trying to resolve a hesitation on rapid throttle opening, this is a meaningful advantage. Make sure the locknut is tightened after adjustment: a pump rod that shifts position during driving will produce inconsistent acceleration behaviour that is genuinely confusing to diagnose.
Built-in vacuum ports. The DHLA has tapped vacuum ports on the carburettor body specifically for connecting a manometer during balancing. Connecting a four-column water manometer directly to these ports gives an extremely accurate and stable balance measurement. The Weber DCOE requires adaptors or intake manifold tappings to achieve the same result. A minor point, but at the end of a long balancing session on a triple installation it feels like a considerably more important one.
Before any tuning: the foundations that must be correct
Everything that applies to the Weber DCOE pre-setup applies equally to the DHLA. Ignition timing confirmed and correct. No vacuum leaks anywhere in the induction system. Valve clearances set. Fuel pressure within the correct range: the DHLA, like the DCOE, is sensitive to excess fuel pressure, and a pressure regulator is part of a properly installed DHLA setup rather than an optional refinement.
Float level on the DHLA must be set before anything else. The float chamber maintains the fuel level that all circuits draw from, and an incorrect level produces rich or lean symptoms across the entire throttle range that are indistinguishable from jetting errors until the float level has been checked and confirmed. The measurement method is the same as the Weber: invert the carburettor, measure from the gasket face to the underside of the float with the float in the closed (needle seated) position, and compare against the specification for your specific DHLA model. Adjust by bending the float arm tab. Do this before adjusting anything else.
Choosing venturis and starting jetting
The venturi selection formula for the DHLA is identical to the Weber DCOE: match the venturi size to the engine rather than assuming that the largest available venturi gives the best result. It does not. It gives the best top-end airflow at the expense of everything below it, which is a reasonable compromise for a circuit racer and a poor one for a road car.
Starting point jetting: main jet equals venturi size multiplied by four. Air corrector jet approximately 60 larger than the main jet. The Dellorto idle air jet holder uses different designations from the Weber F-series (Dellorto uses the 7850.x system), but the principle is identical: the holder controls the air emulsification in the idle circuit, affecting the idle-to-progression transition. Start with the 7850.2 holder for most road applications on modified engines. The 7850.1 gives a richer transition; the 7850.6 gives a leaner one.
A useful starting point for idle jets on a typical 1600 to 2000cc road engine: 45 to 55 range, depending on the engine’s idle characteristics and the specific DHLA model. Start at the middle of the range and adjust based on the idle mixture screw position: if more than two and a half turns out are needed for a clean idle, the idle jet is too small. Less than three quarters of a turn and the jets are too large.
Balancing: barrel to barrel, then carburettor to carburettor
Balance before jetting. This is the rule that experienced DHLA owners apply without exception and that less experienced ones learn to apply after their first extended and futile jetting exercise on an unbalanced set of carburettors. An unbalanced installation produces symptoms that look exactly like jetting problems. It cannot be jet-tuned into correct operation. The balance must be established first, the jetting refined afterward.
The DHLA has two balance adjustments within each carburettor. The idle air bypass screw equalises airflow between the two barrels of the same carburettor. These should be fully closed as the starting point. The throttle balance lever screw (the external adjusting screw on the linkage between carburettors) synchronises the carburettors to each other.
Balancing procedure, in sequence: connect a four-column manometer to all four vacuum ports (on a twin installation), or all six vacuum ports on a triple. With the engine at operating temperature and idling at 900 to 1000 rpm, compare the vacuum readings across all barrels. They should be equal. Start by equalising the two barrels within each carburettor using the idle air bypass screw on each unit. Then equalise between carburettors using the throttle balance linkage. The DHLA’s built-in vacuum ports make this process considerably more convenient than on a Weber installation requiring adapted fittings.
A lesser-known detail: the idle air bypass screw on the DHLA is often covered with anti-tamper paint or sealed with a small plug on emission-equipped versions. If the screw head is inaccessible or lacks a conventional screwdriver slot, replacement screws are available from Dellorto specialists that protrude from the carburettor body and accept a normal screwdriver. Fit these before attempting the balancing procedure, not during it.
Setting idle mixture and speed
With the carburettors balanced, both barrel to barrel and carburettor to carburettor, set the idle speed to 900 to 1000 rpm using the throttle stop screws. Then adjust the idle mixture screws, accessible from outside the carburettor body without tools. Turn each screw in small increments (a quarter turn at a time), wait for the engine speed to respond, and adjust toward the fastest idle speed at each screw position. When the fastest idle is found, reduce idle speed back to the target using the throttle stop screws.
The idle circuit on the DHLA, like the Weber, controls fuelling across most of the normal driving range. Getting it right is not merely about idle quality. It affects part-throttle response, cruising economy, and the smoothness of the transition onto the main circuit. Take time on this adjustment. Four mixture screws on a twin installation, six on a triple: adjust them in a consistent sequence and note the screw position at each stage so you always know where you are relative to where you started.
The accelerator pump: the external advantage
Once the idle and balance are established, test the accelerator pump response by blipping the throttle sharply from idle. The engine should respond immediately and cleanly. A hesitation or stumble on quick throttle opening indicates insufficient pump volume or incorrectly timed pump delivery.
To increase pump volume on the DHLA: lengthen the pump rod by adjusting the external nut, increasing the stroke of the pump diaphragm. To reduce it, shorten the rod. Check that both sides of a twin-choke carburettor are delivering equal pump volumes: graduate vials that screw into the pump jet receptacles are available as a specialist tool and allow the pump output of each barrel to be measured and compared directly. Equal volume from each barrel across twenty full throttle strokes is the target. Adjust the pump rod length until both barrels match and the total volume meets the specified figure for your DHLA model.
Tighten the locknut on the pump rod after every adjustment. This is the detail that gets forgotten in the focus on getting the volume right, and a pump rod that works loose produces a hesitation that reappears at apparently random intervals until the locknut is tightened and stays tightened.
Confirming jetting with plug reading
After completing the setup sequence, a plug reading following a run that includes load and varied throttle confirms whether the main circuit jetting is correct across the operating range. Light tan to grey-brown on the insulator is the target. Black and sooty means rich main jetting. White or very pale means lean. Our spark plug diagnosis guide covers the full range of conditions.
Change one jet at a time and in one carburettor at a time if investigating a jetting fault. Changing multiple jets simultaneously makes it impossible to know which change produced which effect. Keep a note of every change made and its result. The DHLA jetting process is iterative by nature and the notes from session three will save time in sessions four and five. Running a wideband lambda sensor during road testing, if you have access to one, removes most of the guesswork from main circuit jetting and reduces the number of sessions required significantly.
Parts availability: the honest picture
Weber parts are more widely available and somewhat cheaper than Dellorto equivalents. Jets, floats, needles, and service kits for the DCOE are stocked by a larger number of suppliers and in a wider geographical spread. The DHLA is well supported by dedicated Dellorto specialists (Eurocarb in the UK being the primary one), but the choice of supplier is narrower and prices for some components are higher. This is not a reason to choose a Weber over a Dellorto, but it is worth knowing before installation rather than after the first service kit is needed. Budget slightly more for DHLA consumables than for DCOE equivalents and you will not be surprised.
Stub stacks, velocity trumpets, and uprated air filters
What sits on the inlet of a DHLA matters. More than most people realise when they are focused on jetting and balance, the inlet arrangement shapes the airflow entering the barrel and has a direct effect on both the power curve and the jetting requirements. On a triple installation particularly, getting this consistent across all six barrels is an important part of the overall setup.
Stub stacks and velocity trumpets
A stub stack (also called a velocity stack, velocity trumpet, or ram pipe) is a short bellmouthed tube that fits into the DHLA inlet, smoothing and accelerating the airflow before it reaches the butterfly. Running without a stack, with the bare barrel exposed, gives worse induction efficiency than even a short stack provides. The bellmouthed entry is not cosmetic: it shapes the air column entering the carburettor and makes the engine’s breathing more consistent across the rev range.
Stack length affects the power curve in a predictable way. Longer stacks amplify the ram effect of induction pulses at lower engine speeds, building torque in the mid-range. Shorter stacks favour top-end airflow where pulse tuning is less relevant and maximum unrestricted flow takes priority. For a road engine on a classic British six-cylinder, 50mm stacks are a sensible starting point: they deliver genuine mid-range improvement without the clearance compromises that longer stacks can create in a crowded engine bay. For a competition engine built to deliver peak power above 6000rpm, shorter stacks lean into the top end where the power will be used.
On a triple installation, all six stacks should be the same length. Mixing stack lengths across a triple setup introduces different airflow and induction pulse characteristics to different pairs of cylinders, which produces an imbalance that the balance procedure cannot fully correct because the fundamental physics of each barrel are different. Buy them as a set. Check them with a ruler before fitting. This sounds obvious and yet is done incorrectly with sufficient regularity to be worth mentioning specifically.
Uprated air filters: K&N, ITG, and the alternatives
Running completely open stacks on a road car puts unfiltered air directly into the carburettor barrels and, via the jets, into the engine. On a competition car this is standard practice and entirely acceptable. On a road car driven on public roads it is an invitation to introduce everything that roads contain into an engine that cost significantly more than the money saved by not buying a filter. Fit filters.
K&N RC series pod filters are the most widely used uprated filter choice for DHLA and DCOE sidedraught installations. An oiled cotton gauze element provides high-flow filtration substantially better than a paper element while creating minimal restriction compared to the open stack. They fit over the outside of the stub stack: check the OD of your specific stacks before ordering since sizes vary across different stack diameters and carburettor configurations. ITG Filters, made in Britain, and Sprint Filter, an Italian motorsport specialist, are credible alternatives with enthusiastic followings in competition circles.
The filter goes on the stub stack, not directly on the carburettor face. A pod filter fitted without a stub stack between it and the barrel allows the filter media to disturb airflow at the inlet itself, which defeats part of the purpose of both components. Stack first, filter on the stack. The stack creates the smooth bellmouth entry; the filter protects everything downstream. Both are needed and the sequence is not interchangeable.
K&N filters need periodic cleaning and re-oiling. The K&N Recharger kit is the correct approach: clean, allow to dry, apply a light coat of the specific K&N oil, allow it to soak in, remove any excess, refit. Over-oiling deposits residue on the inlet that gradually builds up and is not helpful. The cleaning interval depends on use and conditions: dusty roads shorten it considerably, occasional clean-road use extends it. Inspect the filter when servicing the carburettors rather than on a separate schedule.
What changes when you change the intake: jetting implications
Changing the air intake arrangement on a DHLA changes the jetting. This catches a substantial number of people out, because the car ran perfectly well on the previous setup and now, having fitted some beautiful new stacks and K&N filters, it runs noticeably differently. It is supposed to: the airflow characteristics have changed and the jetting calibrated for the previous setup is no longer correct for the new one.
Switching from a closed cold air box to open stacks and pod filters typically leans the main circuit: more air enters, the same fuel is delivered, and the mixture weakens. Richening the main jets by 5 to 10 sizes is a typical starting point after this change. The idle and progression circuits may also require attention. Treat any significant intake change as the beginning of a fresh jetting session rather than assuming previous settings will carry over. They will carry over partially, but not precisely, and the difference between partially correct and correctly correct is exactly the flat spot or hesitation that turns a performance upgrade into a frustrating experience.
Heat soak is worth considering on any open stack installation. Pod filters and open stacks draw air from the engine bay, which is considerably warmer than the air outside the car. Hot air is less dense than cold: the engine effectively receives less oxygen per stroke than it would from a cold air feed, and the mixture shifts slightly lean relative to a cold ambient temperature baseline. The effect is most noticeable on a hot day after a run in traffic, where the engine bay temperature can be 20 to 30 degrees above ambient. A dedicated cold air induction setup, ducting cooler air from outside the engine bay to the carburettors, addresses this properly and produces more consistent behaviour across varying ambient conditions. On a triple installation, routing six individual cold air feeds is a packaging exercise that requires some ingenuity, but the consistency of jetting across temperature ranges is a worthwhile reward for the effort.
And then there is the noise. Six barrels of open stub stacks on a triple DHLA installation, at full throttle, produce an induction sound that is genuinely extraordinary. It is loud, it is distinctive, and it is one of those things that makes the considerable effort and expense of a triple carburettor installation feel entirely justified in the moment. Whether it remains justified when the neighbours express an opinion is a separate matter and one that each owner navigates in their own way.
Common problems on the DHLA
- Flooding: float level too high or fuel pressure excessive. Fit a regulator if not already installed. Check float needle valve for contamination or wear.
- Rich throughout the range, does not respond to idle mixture screw: float level, not jetting. Check float level before changing any jets.
- Hesitation on acceleration: accelerator pump volume too low or pump rod incorrectly adjusted. Check pump output with graduated vials before adjusting jetting.
- Uneven idle on triple installation: linkage not opening all three carburettors simultaneously. Check throttle plate synchronisation mechanically before touching anything else.
- Idle will not settle despite correct mixture: vacuum leak, idle air bypass screws not fully closed from initial setup, or anti-tamper plugs preventing correct adjustment of bypass screws.
- Flat spot in mid-range: idle jet too small, causing progression circuit fuel starvation as throttle opens. Increase idle jet one size and retest before adjusting the idle air jet holder.
- Car runs well when cold, deteriorates as it warms: fuel vaporisation in the float chamber due to heat soak. Heat shielding between the carburettors and exhaust manifold, and insulating spacers between carburettors and inlet manifold, are effective remedies on close-coupled installations.
The honest comparison: DHLA versus DCOE
Both carburettors are excellent. On an engine suited to either, the performance results are effectively identical. The DHLA’s externally adjustable pump and idle screws are genuine ergonomic advantages for the home tuner. The Weber’s wider parts availability and lower service costs are genuine practical advantages for the owner who uses the car regularly and services it themselves. The DHLA’s built-in manometer ports are a meaningful convenience on triple installations where balancing multiple barrels is a significant task.
If someone is offering you a good set of DHLAs with manifold and linkage at a reasonable price, take them. If a good set of DCOEs is available for the same money, take those instead. The difference in outcome, when either is properly set up for the engine in question, is sufficiently small to be irrelevant to the decision. The quality of the setup matters far more than the badge on the carburettor. A rolling road session with either, following the baseline preparation described here, will produce a car that is substantially more rewarding to drive than either would be left to the mercy of inherited jetting and hopeful optimism.
For related reading: our Weber DCOE guide covers the sidedraught alternative in equivalent detail, our SU carburettor guide covers the constant depression alternative for owners considering their options, our ignition timing guide covers the timing confirmation that must precede any carburettor setup work, and our fuel system guide covers E10 compatibility and fuel pressure considerations relevant to all high-performance carburettor installations.
This page contains affiliate links. If you click a link and make a purchase, Classic Car Hub may earn a small commission at no extra cost to you.