The engine bay on a classic British car tells a story. Unfortunately, on most of the ones that come up for sale, the story is “a previous owner sprayed everything gloss black in 1994 and called it a day.” This is not a restoration. It is a coverup, and not a particularly convincing one to anyone who knows what colour the engine bay should actually be. The good news is that getting an engine bay right is one of the more achievable cosmetic projects on a classic car, provided the right colours are established before a tin of paint is opened rather than after. The bad news is that the correct colour for the engine bay on most classic British cars is not black. It is the same colour as the outside of the car, which surprises a significant proportion of owners every time it is mentioned and explains a lot about the engine bays one encounters in paddocks.
This guide covers the complete engine bay detailing and restoration process: degreasing correctly, identifying what colour everything should actually be, what gets painted and what emphatically does not, the finishing details that separate a presentable engine bay from a concours-correct one, and the specific errors that tend to show at precisely the moment you are trying to impress someone.
Set your ambitions before picking up a brush
There is a meaningful difference between a concours-correct engine bay and a clean, presentable one, and the difference is not merely in standard but in the amount of documented research required. A concours engine bay requires knowing the exact paint codes used on the block, the precise specification of every clamp and cable tie, the routing of the wiring harness, and the finish level (gloss, semi-gloss, satin) of every component. A concours judge will know all of these things and will get on their knees with a torch to verify them. A presentable engine bay requires correct colours, a thorough clean, and the absence of the most obviously wrong items. Both are legitimate goals. They are not the same project and should not be started with the same timeline.
This guide addresses the presentable-to-correct range, because that is where most owners are working. The concours path requires marque-specific research from owners clubs and factory records, and no general guide substitutes for that specific knowledge. What it can do is make sure you start from the right foundation rather than discovering two weeks into the project that you have been using the wrong colour throughout.
Period-correct colours: the research that saves you from yourself
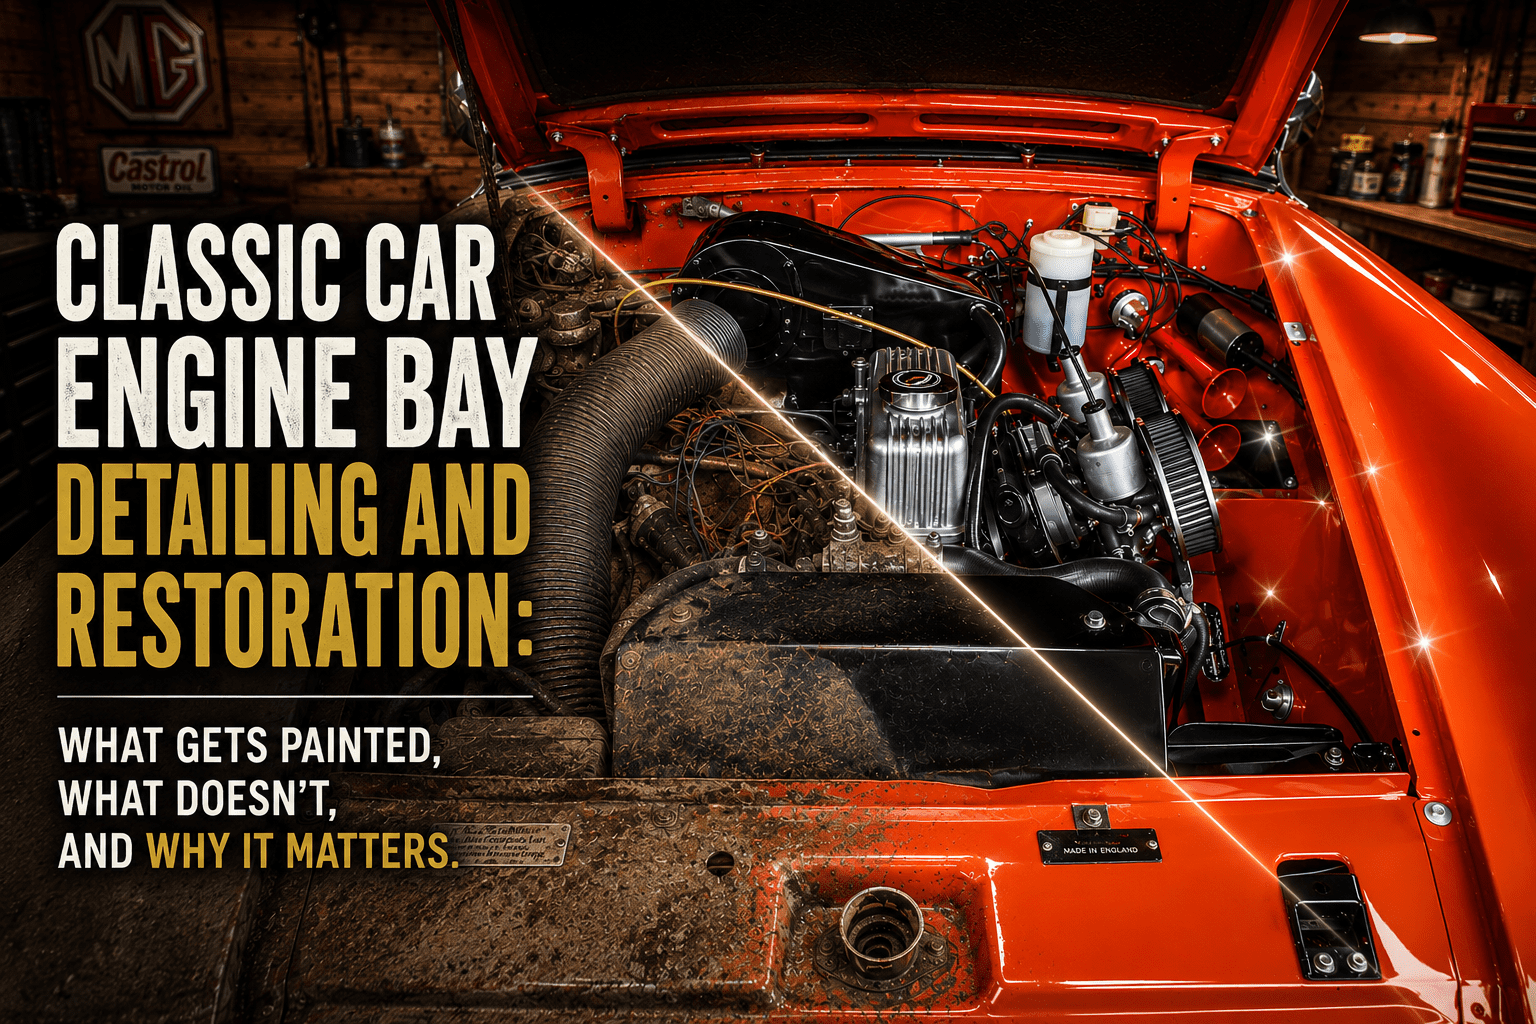
Here is the fact that surprises most owners of classic British sports cars when they first encounter it: on the MGB, the MG Midget, the Austin-Healey range, the Triumph TR series, and most other classic British monocoque sports cars, the inner wings, bulkhead, and engine bay walls are body colour. They are body colour because the car was painted as a complete shell before the mechanical components were installed. The inner wing is not a separate chassis component that can be painted in a contrasting scheme: it is the inner wing of the car, and it received the same paint as the outer wing at the same time in the same spray booth. A black engine bay on an MGB is the most reliable single indicator of a respray somewhere in the car’s history, because the painter did not remove the engine, so the engine bay stayed in the previous colour while the outside changed. If you are buying a classic British car and the engine bay is a different colour from the exterior, the car has been resprayed. The engine bay is where the evidence survived.
Useful bonus tip: to find the original body colour on a car of genuinely unknown history, look behind the dashboard. This area is almost never resprayed even on cars that have had multiple exterior respray jobs, because it requires significantly more disassembly to reach. The paint behind the dashboard tells you what colour the car was when it left the factory. It is the closest thing a classic car has to a confession.
The engine itself is an entirely different matter, and this is where the specific research for each model becomes essential. On the MGB, the B-Series engine was painted maroon from the start of production through to August 1971, when the introduction of the 18V engine brought a change to black that lasted for the remainder of the production run. A 1969 MGB with a black engine block has an incorrectly painted engine. A 1974 MGB with a maroon engine block has an incorrectly painted engine in the other direction. Both are wrong and both will be noticed, because the maroon-to-black transition is one of the better-documented specification changes in MG history and a reasonable proportion of the people who attend MG events know it.
The MGC adds a specific complication: despite looking broadly similar to the MGB and sharing many components, it used the C-Series engine rather than the B-Series, and the C-Series engine was green. The same pale silver-grey-green used on the Austin-Healey 3000, available from Moss Europe and Austin-Healey specialists as “Healey Green.” An MGC restored with a maroon or black engine block has been given the wrong engine colour by someone who assumed it matched the MGB. It does not. The engines look similar. The colours do not.
The Austin-Healey 3000 used the Healey Green C-Series throughout, a colour that is immediately recognisable to Healey owners and immediately identifiable as wrong if substituted with anything else. The very earliest Austin-Healey 100s used a dark blue engine before the colour settled into Morris Green and then Healey Ice Green across subsequent production. Triumph TR6 engines were painted semi-gloss black throughout most of the production run. The finish specification is as important as the colour: engine components should be semi-gloss, not the gloss finish used on the body panels. A uniformly glossy engine bay reads as incorrect even when the colours are right, because the factory never produced one.
Before opening a tin of anything, consult the relevant owners club. The MG Car Club, the Triumph Register, and the Austin Healey Club all maintain documented colour specifications. The club knows what your car should look like. Asking costs nothing and saves the specific experience of discovering the correct colour after applying the wrong one.
Degreasing: the only step that is not optional
A classic car engine bay that has not been cleaned in a meaningful sense since a previous decade contains a substance that is not quite grease, not quite dirt, and entirely unsuitable as a base for paint or dressing. It forms when engine oil, road grime, rubber residue, and the quiet passage of time combine in a warm enclosed space. It is the automotive equivalent of the substance that accumulates in kitchen extractor fans, except less removable and more geologically interesting. Any paint or dressing applied over it will lift within months. Degreasing properly is not a preparation step for the actual work. It is the actual work, and the actual work takes longer than expected.
Cold engine only. Hot engine plus cold water is not a restoration technique. Allow it to cool completely, then spend five minutes covering things before reaching for the degreaser. Cover the distributor cap, coil, fuse box, ignition module, any electronic ignition unit, and carburettor air intakes with plastic bags. The SU electric fuel pump is not waterproof. Wiring connector blocks should be covered. This takes five minutes and prevents the specific frustration of a car that starts beautifully before the degrease and does not start at all after it.
Apply Bilt Hamber Surfex HD diluted to degreasing concentration, or an equivalent water-based degreaser, with a stiff brush. Work it into the accumulated deposits around the engine, along the inner wings, and across the bulkhead. Allow five to ten minutes dwell time: the chemistry needs time to penetrate the deposit, and impatience at this stage means a second application at the next stage. Rinse with a garden hose at normal pressure, working from the top downward. A pressure washer at close range near electrical components is not advisable. The garden hose takes longer and produces identical results without the drama. A first degrease on an engine bay that has never been properly cleaned almost always reveals a second layer beneath the first, and a second application is frequently needed. This is not a failure. It is the nature of the substance being removed.
Allow the bay to dry completely. A hairdryer pointed into the corners does this faster than waiting and gets into the areas that gravity cannot reach. Once dry, run the engine briefly to evaporate any remaining moisture from electrical components before the covers come off.
What gets painted and what absolutely does not
This section contains the most commonly misunderstood information in engine bay restoration. Getting it wrong is the reason so many classic British engine bays look simultaneously clean and incorrect.
Gets painted in body colour: the inner wings, the bulkhead, the slam panel, the suspension turrets, the bonnet inner surface, and the battery tray where it is integral to the structure. These are body panels. They received body colour at the factory. They should receive body colour now.
Gets painted in engine colour: the engine block, the cylinder head, and the rocker or cam cover, in the specific colours established through the research described above. The engine block and head require high-temperature engine enamel, not standard body paint. The engine reaches sustained temperatures that standard enamel cannot withstand: it blisters, peels, and looks worse than it did before the effort within a single season. High-temperature engine enamels rated to at least 250 degrees Celsius are available in maroon, black, and Healey Green specifically for classic car applications from Frost Restoration, Halfords, and the major classic car suppliers.
Does not get painted: rubber hoses. This needs to be said plainly because painted rubber hoses appear so frequently on otherwise well-presented classic cars that someone must be painting them with genuine conviction. They look wrong. They crack within months as the rubber flexes and the paint cannot. Clean black rubber hoses, dressed with 303 Aerospace Protectant or Autoglym Vinyl and Rubber Care applied sparingly, look more period-correct than painted hoses in any colour. Including black.
Does not get painted: the wiring harness. Classic British wiring harnesses have specific colour codes identifying each wire’s function. Paint over them and this information is gone permanently. Clean with a damp cloth. Leave them alone otherwise.
Does not get painted: brake and fuel pipes. Steel pipes should look like zinc or phosphate-finished steel. Copper pipes should look like copper. Neither should be painted, regardless of how much cleaner it would look.
Does not get painted: fasteners. Standard nuts, bolts, and studs should have a zinc or phosphate appearance. Chrome-plated fasteners are wrong on a period engine bay and read immediately as a show-car affectation. The fasteners on a factory engine bay were workmanlike items. They looked like fasteners, not jewellery.
The painting procedure
Light abrasion of the inner wings and bulkhead with 320-grit wet-and-dry creates a key for the new paint. Any bare metal exposed during cleaning needs etch primer before topcoat: bare metal painted directly with body colour will not adhere correctly and will lift at the edges within a season, which is a specific frustration given that the degreasing was done to prevent exactly that outcome.
For a show-quality result, the inner wings and bulkhead benefit from a proper two-pack or sprayed single-stage enamel. For a presentable result, a rattle-can single-stage enamel in the correct body colour is entirely adequate and considerably more manageable for a home restorer without spray equipment. Apply in thin coats from the correct distance: 25 to 30 centimetres, two or three passes with adequate flash-off time between them. A heavy single coat applied too close runs. Runs in the engine bay are visible every time the bonnet is raised, which on a classic car being shown is frequently.
Engine dressing: the less-is-more principle that most people learn the hard way
Engine bay dressing products applied to the clean unpainted components, wiring, and ancillaries provide a clean, slightly sheen finish that resists dust and makes subsequent cleaning easier. Autoglym Engine and Machine Lacquer is the standard choice in the UK. It is applied as a fine mist, allowed to dry, and produces a finish that reads as carefully maintained without looking as though the engine bay has been treated with cooking oil.
The cooking oil effect is the specific failure mode of too much engine dressing, and it is achieved by a significant proportion of first-time users. Apply from the correct distance in a fine mist. If it runs, too much has been applied. Wipe off the excess, allow to dry, and note the correct amount for next time. An engine bay that looks wet and over-dressed is less presentable than one that has simply been cleaned. The dressing should be invisible in effect: the bay looks clean and cared for, not lacquered.
The finishing details: what show judges and knowledgeable owners notice
The difference between a presentable engine bay and a concours-correct one is frequently a collection of small details rather than any single large item. These are the things a judge who knows the car checks, often on their knees with a torch, and the things that a knowledgeable owner notices in a paddock before saying anything complimentary about the rest of the car.
Hose clamps: the type of clamp is specific to the era. Modern stainless Jubilee clips with their wide bands and rolling stampings are not the same as the period items and are immediately identifiable as replacements. For a concours bay, correct period-specification clamps are available from marque specialists. For a show bay, any clamp of approximately correct style is acceptable. A modern T-bolt clamp on a 1965 MGB is not.
Coolant hoses: black rubber throughout. Blue silicone hoses are useful on a track car where performance and longevity take priority over originality. On a road car being shown as period-correct, they are incorrect and they are immediately visible. The same applies to red silicone. The factory fitted black rubber and black rubber is what correct looks like.
Cable ties: the nylon cable tie appeared in factory production from the late 1960s onward. Pre-1967 cars did not have cable ties as original equipment: wiring was secured with rubber-covered wire clips, loom tape, and retention clips. Fitting cable ties to a pre-1967 car is convenient and harmless to the car’s function. It is visible to a judge. Correct retention clips are available from marque specialists for most applications.
Spark plug leads: original specification plug leads on most classic British cars were black with cloth-braid outer or black rubber, depending on the era. Blue, red, or chrome-tipped silicone spiral-wound leads are performance items. They are not period correct on a car being shown as original.
The battery: should be an original-profile unit that fits the tray without adaptation, with terminals in the correct positions. A modern calcium battery wedged in with a piece of timber because the terminal height does not match the original tray is visible and incorrect.
The mistakes that show the most
Black engine bay on a body-colour car. The single most common engine bay error on classic British cars. It is not a criticism of the previous owner who did it: black is easy, covers everything, and looks tidy. It is simply incorrect, and restoring to body colour is the most significant single improvement available to a miscoloured engine bay.
Everything the same finish. Factory engine bays combined gloss body colour on the structural panels with semi-gloss engine components and natural finishes on the electrical and mechanical items. A bay where inner wings, engine block, alternator, starter motor, wiring, and hoses are all the same gloss black reads as thorough rather than correct. The uniformity is the tell.
Chrome everything. Polished cam covers, chrome rocker covers, polished carburettor bodies, and plated fasteners look impressive and appeal to a specific aesthetic that is entirely valid in the custom car world. On a car presented as a correct restoration of a period road car, they read as personalisation rather than preservation. A judge will note them all. So will anyone who owned the same model from new.
Wrong engine colour. Maroon where it should be black, black where it should be green, green where it should be maroon. These are all avoidable with fifteen minutes of research. They are also the kind of error that generates a specific silence from a knowledgeable observer in the paddock: the silence of someone who has noticed something and decided not to start the conversation.
For related reading: our classic car detailing guide covers the exterior and interior detailing that the engine bay work should complement, our rust prevention guide covers treating the inner wings and bulkhead before paint goes on, our MG paint colour codes and Triumph paint colour codes guides provide the body colour references for engine bay painting, and our workshop safety guide covers the specific precautions for working with spray paint and degreasers in enclosed spaces.
This page contains affiliate links. If you click a link and make a purchase, Classic Car Hub may earn a small commission at no extra cost to you.