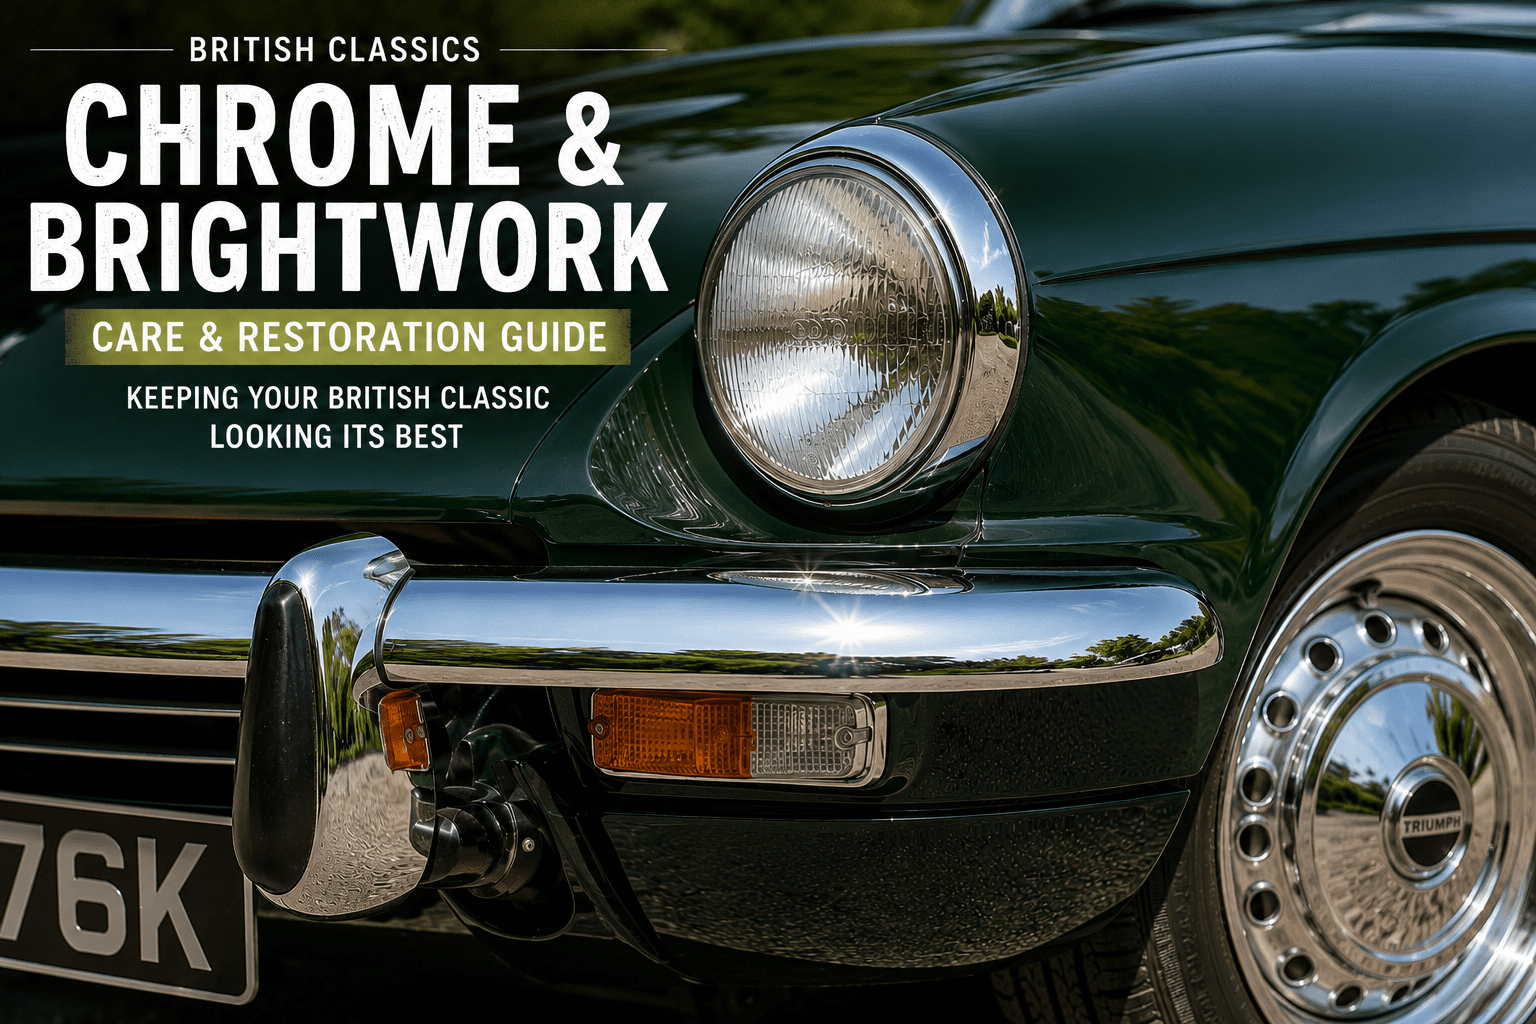
Chrome is the thing that makes the difference. A classic British car with tired paintwork and perfect chrome looks like a car with a project ahead of it. The same car with perfect paintwork and tired chrome looks like a car that somebody didn’t quite finish. Chrome sits on the bumpers, around the headlamps, along the window surrounds, on the door handles, on the bonnet badge, and on the grille, which means it sits in the first place the eye goes when it looks at the front of the car. When it is right it is magnificent. When it is not it is the most visible thing on the vehicle.
This guide covers the full range of what chrome requires: regular cleaning and polishing to stay presentable, an honest account of how far polishing can actually take pitted or rusting chrome before more significant intervention is needed, what professional replating involves and what it costs, what the DIY replating kits can genuinely achieve (and on what), and a brief honest note about the plastic chrome that appears on British classics from the 1970s onwards. There are no product recommendations here, which is a slightly difficult sentence to follow when Autosol has been in the workshop since before the internet existed and continues to produce results that justify its shelf space. Draw your own conclusions.
What chrome actually is
The bright mirror finish on a classic car bumper or headlight bezel is not simply a thin coat of chromium applied to bare steel. It is the product of a carefully sequenced multi-layer electroplating process in which chromium is actually the last and thinnest component, so thin it is measured in millionths of an inch. Beneath it is a layer (or two) of nickel, which is responsible for most of the brightness and depth that people think of as the chrome look. Beneath the nickel is a copper layer, which smooths the surface and provides adhesion between the steel substrate and the nickel above it. The copper layer is also the one that can be built up in multiple applications with polishing between each one, which is how professional platers fill pits and scratches in the base metal before the nickel goes on.
Understanding this layered structure explains several things about chrome behaviour that would otherwise seem puzzling. It explains why polishing, which can only affect the surface of the outermost layer, reaches its limit when pitting has gone through the chromium into the nickel beneath. It explains why bubbling chrome is not the chromium itself rusting: by the time chrome bubbles, rust has formed in the nickel or the base steel underneath, lifting the entire plating sandwich from below. And it explains why preparation is the entire game in replating: the chromium follows the surface it is deposited on with perfect fidelity. If the copper and nickel beneath are not smooth, the chromium is not smooth. Chrome does not fill or forgive. It reveals.
Day-to-day cleaning
Chrome in reasonable condition requires very little beyond regular washing with clean water and a soft cloth, followed by drying before water spots form and mineral deposits begin to etch the surface. Road grime, bird deposits, and tree sap should be removed promptly rather than left to work their way into the micro-pitting that develops over time on any chrome surface. A soft detailing brush reaches into the cavities around badges, grille slats, and headlamp surrounds where cloth cannot go without scratching the adjacent chrome on the exit.
For light tarnishing and very superficial surface rust, a piece of aluminium foil dipped in water, crumpled into a loose ball, and gently rubbed over the affected area produces a mild galvanic reaction between the aluminium and the iron oxide that lifts the rust without scratching the chrome. This works, reproducibly and reliably, and the slight indignity of cleaning a classic car bumper with kitchen foil is offset by the results. A mildly acidic chrome cleaner achieves the same thing in a more professional-feeling manner.
Polishing: what it achieves and what it cannot
A chrome polish removes oxidation and very light surface contamination from the outermost chromium layer, revealing the brightness beneath and restoring the mirror quality that tarnishing obscures. Applied with a soft cloth in straight lines parallel to the length of the trim, it produces results that are visible immediately and that repay the effort. Applied in tight circles, it can introduce hairline swirls that are visible in bright sunlight, so the straight-line technique matters. Apply to the cloth rather than directly to the chrome: product that gets into seams and joints dries to a white deposit that is considerably more difficult to remove than the polish was to apply.
After polishing, a thin coat of carnauba wax or a dedicated chrome sealant provides a barrier between the chromium and the moisture and atmospheric pollution that causes it to tarnish. The protection is not permanent: it washes off over time and needs reapplication. But a polished and waxed chrome surface stays presentable considerably longer than a polished but unprotected one, particularly on a car that is used in rain or stored in a garage with humidity fluctuations. The wax also slightly fills the micro-pitting that develops on older chrome, which is why freshly waxed chrome often looks marginally better than freshly polished chrome without wax.
One note on application that saves product and time: apply chrome polish to a cloth, not to the chrome, and work in small sections. The product spreads further than expected from a cloth application and the smaller section approach allows each area to be buffed before the product dries too hard.
The pitted chrome question
The question of whether pitted chrome is salvageable by polishing or requires professional attention is the question most owners of classic British cars eventually face, and the honest answer is that it depends on where in the spectrum of pit severity the chrome sits. The spectrum has distinct stages and the appropriate response is different at each one.
The fingernail test is the most practical first assessment. Run a fingernail slowly across the pitted area. If the fingernail passes over the pits without catching, the pits are superficial: they sit in the chromium layer and polishing will reduce their visibility significantly. If the fingernail catches in the pits, they have gone through the chromium into the nickel or deeper, and polishing will not fill them. It will clean and brighten the surrounding chrome, which by contrast may make the pits more visible rather than less.
Stage one: surface tarnish and micro-pitting. The chrome has lost its mirror quality and looks dull or grey. Polish restores it. This is the maintenance stage and should not be allowed to progress further through neglect.
Stage two: light pitting with the fingernail passing over. The chromium layer has pitted but the pits are within the chrome itself. Polish improves the appearance significantly, reduces the visibility of the pits, and wax slows further progression. The chrome is not deteriorating rapidly if maintained. The car looks presentable at normal viewing distances and acceptable on closer inspection.
Stage three: pitting the fingernail catches in, with the chrome still intact and flat. The plating has been penetrated and the pits are into the nickel or approaching the copper. Polishing will not fill them. The chrome is not yet bubbling or flaking but the substrate is being reached by moisture. This is the stage where the question becomes whether the component justifies professional replating, replacement with new old stock or reproduction parts, or continued maintenance as a driver-standard piece that will not improve further.
Stage four: bubbling or lifting chrome. Rust has formed under the plating and is lifting it from below. This is not a polishing problem. The plating is structurally failing and will continue to do so: the bubbles grow, the chrome lifts further, and what was one isolated bubble becomes a spreading area of delamination. The options at this stage are professional replating, replacement, or acceptance that the component is going to continue deteriorating. Polish will not arrest this process.
Stage five: flaking and bare metal visible. The plating has failed and corrosion of the base metal has begun. This requires stripping, substrate repair, and full replating. Stage five chrome held in place with chrome paint or silver aerosol is a temporary cosmetic measure and should be understood as one rather than a repair.
Professional replating: what happens and what it costs
Professional chrome replating on a classic car part is not simply applying chrome over the existing surface. The existing plating must be stripped first, either chemically or mechanically, until the bare base metal is reached. The base metal is then assessed for pitting, scratching, and corrosion damage. Any significant pitting is addressed at the copper plating stage: copper can be built up in layers with polishing between applications, the accumulated copper filling the pits and scratches until the surface is genuinely smooth. Getting this stage right is where the cost of quality professional work is justified: a professional who rushes the copper stage is sending imperfect substrate through to the nickel and chrome, and every remaining imperfection will be visible in the finished mirror surface.
Once the copper is smooth and polished, nickel is applied, typically in two layers (semi-bright followed by bright nickel) on automotive parts. The dual-nickel approach provides better corrosion protection than a single layer because the bright nickel acts sacrificially, protecting the semi-bright nickel and the base metal beneath it. The final chromium layer goes on last and is genuinely very thin: its function is hardness, a slight blue-cool tone, and resistance to scratching rather than providing significant corrosion protection or bulk. The depth and warmth of the chrome finish comes from the nickel. The brightness comes from the polishing of each layer before the next is applied.
Costs vary significantly by component size and condition. Small items, door handles, headlight bezels, and badges, typically run from £30 to £100 each at a quality UK plating specialist. A pair of bumpers, which involve significant surface area and often require extensive copper work on the substrate, typically cost between £400 and £800 for the pair in good original condition, rising significantly if the substrate needs major work. A full set of chrome trim for a classic British sports car, bumpers, headlight surrounds, grille surround, door handles, and all the smaller pieces, can reach £1,500 to £3,000 at a quality plater doing the job properly. This is worth knowing before the decision is made to strip all the chrome off the car simultaneously.
One point worth knowing: professional platers increasingly use trivalent chromium rather than the traditional hexavalent chromium, for environmental and regulatory reasons. The finish from trivalent chrome is marginally different: very slightly warmer and darker in tone than the classic blue-cold hexavalent finish. For most applications the difference is not noticeable to anyone who is not specifically looking for it. For concours restoration of early cars, it is worth discussing with the plater which process they use and whether it matters for the specific application.
Before committing to replating, also check whether quality reproduction or new old stock parts are available for the specific car. For MGB and Midget chrome trim, Moss Europe, Brown and Gammons, and the major MG suppliers hold significant stocks of new reproduction brightwork that is priced competitively against replating and arrives ready to fit. Sending a set of original worn bumpers to a plater for £600 when reproduction bumpers are available for £350 is a decision that makes sense for originality but less sense for economy.
DIY plating kits: an honest assessment
DIY electroplating kits for classic car restoration are a genuine and growing market, and an honest assessment of them requires distinguishing between what they are, what they can achieve, and where they reach their limits. The better kits, from suppliers such as Gateros Plating and ePlating in the UK, are not toys or marketing artefacts. They are scaled-down versions of commercial plating equipment used by their makers’ own restoration projects, and they produce results that are genuinely impressive on the right parts, applied with the right preparation.
The first clarification: the “replica chrome” or “chrome-effect” kits available from most DIY suppliers are not depositing chromium. They use a nickel-cobalt alloy that produces a bright, hard, mirror-quality finish that is visually very similar to chrome, resists scratching similarly to chrome, and is considerably safer to work with than true hexavalent chrome (which is classified as a carcinogen and is subject to significant regulatory restrictions). For most classic car applications, the nickel-cobalt finish is indistinguishable from chrome to the naked eye. For a concours judge looking specifically at the plating chemistry, it is not chrome. For everyone else, it is chrome enough.
The second clarification is the one that most kit marketing underplays: surface preparation is everything, and the preparation process is as involved as the plating itself. The part to be plated must be clean to a standard that approaches chemical cleanliness: grease, oil, and oxidation all prevent the plating from adhering, and the kit process involves degreasing, acid pickling to activate the surface, and in some cases an intermediate copper strike coat before the main plating. Any pitting or scratching in the substrate is reproduced faithfully in the plated surface. A bolt that has been thoroughly cleaned and polished to a smooth surface before plating comes out looking like a new factory part. A pitted door handle that has been inadequately prepared comes out looking like a pitted door handle wearing a shiny coat.
Where DIY kits genuinely earn their place is on the small items that make a restoration look complete: nuts, bolts, brackets, clips, small bezels, wiring connectors, and the dozens of minor brightwork components that a professional plater would charge significant minimums to process. Sending a collection of 40 nuts and bolts and a handful of small brackets to a professional plater is expensive relative to the result. Plating them with a decent DIY kit, with adequate preparation, is satisfying, cost-effective, and produces results that are visible at show-quality distances.
Where DIY kits reach their limits is on large components where the tank size becomes a constraint, where complex geometries make even current distribution difficult, and where the substrate condition requires the copper build-up stage that is difficult to execute at home without a buffing wheel and considerable practice. A large bumper replated at home by a first-time user is unlikely to produce the results that the same bumper would achieve at a professional plater. The skill and equipment gap is real. The same bumper replated at home by someone who has spent six months plating smaller parts and understands the process might come out very well. The kit is not magic. It is a tool, and like most tools it performs proportionally to the skill applied to it.
A specific note on budget kits: the experience of anyone who has bought the cheapest available kit from an online marketplace and then upgraded to a quality supplier is consistent. The cheap kit lacks a means of agitating the electrolyte solution, which means plating times are extended significantly and the deposit is uneven. The better kits include a small pump to keep the solution moving, which makes the process faster and the results more consistent. The price difference between a budget kit and a quality kit from a reputable supplier is usually the difference between frustrating results and rewarding ones.
A note on pot metal
A significant proportion of chrome hardware on classic British cars is not steel but pot metal: a zinc die-cast alloy used for door handles, trim clips, badge surrounds, and various other components where complex shapes were needed without the cost of steel pressing. Pot metal has a specific reputation for swelling, cracking, and crumbling as it ages, because the zinc alloy is susceptible to intergranular corrosion that attacks the material internally. A pot metal door handle that appears intact may be structurally fragile. A pot metal badge surround that shows surface cracks is failing internally.
Plating pot metal requires an intermediate alkaline copper strike coat before the main plating process, because pot metal’s chemistry is incompatible with direct nickel plating. DIY kits that specify this are being honest about the process. Kits that suggest pot metal can be plated directly are less reliable. Any pot metal component with active swelling or cracking cannot be meaningfully replated: the substrate is failing and the plating cannot stabilise it.
Plastic chrome: briefly
British Leyland’s cost reduction programmes of the 1970s introduced vacuum-metallised plastic chrome to the trim of various classic British cars: the Marina, the Allegro, the Maxi, and their era-mates carry plastic chrome in locations where earlier cars had plated metal. It is identifiable by its light weight, its warmth to the touch relative to metal, and the way it scratches rather than pits when damaged. It cannot be plated, cannot be treated with metal polishes, and should not have abrasive products applied to it. It can be cleaned with mild soap and water, treated with a dedicated plastic chrome restorer for light oxidation, and replaced when badly deteriorated, since reproduction parts are available for most common applications. Chrome polish applied to plastic chrome produces immediate dulling followed by lasting regret.
Storage and long-term care
Chrome stored on a car that is laid up for winter benefits from a light coat of petroleum jelly applied to the surface after the final pre-storage polish. This sounds agricultural but it is an effective moisture barrier that dramatically reduces oxidation during storage. It wipes off easily in spring and leaves the chrome in a condition that requires far less polishing to restore. A clean microfibre cloth over individual chrome components inside a breathable car cover addresses the same problem with less mess if the petroleum jelly approach seems excessive.
Do not store chrome components loose in boxes where they can contact each other. Chrome scratches chrome. Any component removed from the car for storage should be individually wrapped in soft cloth or bubble wrap, stored in a dry environment, and laid flat rather than stacked with weight on the surface. The chrome that arrives at the plater in April in worse condition than it left the car in October was stored incorrectly, which is both an avoidable outcome and an annoying one when the plating quote arrives.
For related reading: our classic car detailing guide covers chrome care as part of the full detail process, our rust prevention guide covers treating the areas around chrome mountings where moisture accumulates and rust begins, and our winter storage guide covers laying up the car correctly so that the chrome emerges from storage in the best possible condition.
This page contains affiliate links. If you click a link and make a purchase, Classic Car Hub may earn a small commission at no extra cost to you.