
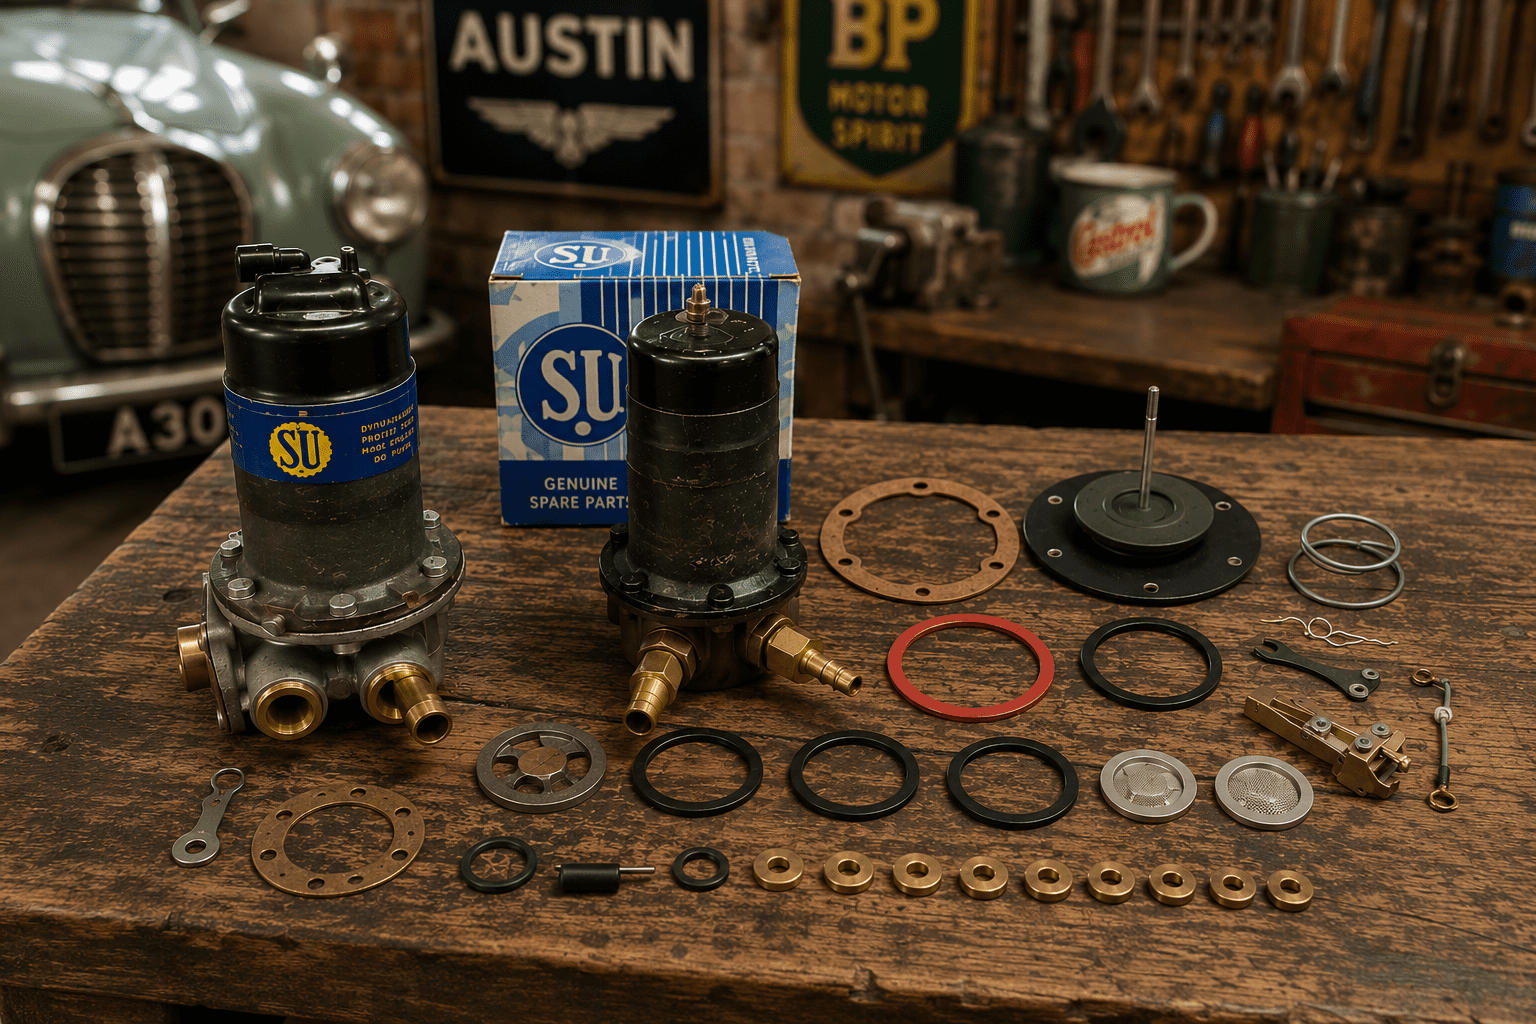
The SU electric fuel pump is one of the most characterful components on a classic British car. It ticks. Rhythmically, persistently, like a small and determined metronome mounted somewhere behind the rear seat. When it is working correctly that tick is one of the most reassuring sounds in classic car ownership. When refuses to stop, stops altogether, or produces a sound that can only be described as distressed, the car is going nowhere until you and the pump have reached an understanding. This guide covers how to reach that understanding quickly, without the roadside despair that normally precedes it.
The SU pump was fitted to an extraordinary range of classic British cars. MGB, Midget, Sprite, Triumph TR series, Spitfire, GT6, Stag, Jaguar E-Type, Austin-Healey, Morris Minor, and many more all used SU pumps at some point in their production lives. Understanding how to test, service, and where necessary rebuild one is knowledge that pays for itself repeatedly over the life of any British classic. The E10 fuel situation has made it more relevant than ever.
Which pump do you have?
Two distinct families of SU pump exist: mechanical and electric. The mechanical pump is driven directly by the engine via a cam and rocker arm, lives on the side of the engine block, and was used on many BMC A-series and B-series applications before the switch to electric pumps. It has no electrical connections and ticks only metaphorically. The electric pump is the more common type on the cars most people are working on: a self-contained electromagnetic unit mounted remotely, usually near the fuel tank, connected by two wires and two fuel pipes.
Within the electric family, the two main variants are the AUF200 series (used on MGA, early MGB, Frogeye Sprite, and early Midget) and the later AUF300 and AZX1300 series fitted to most later classic British cars. The AUF300 is the one most owners will encounter. The model number is cast into the pump body. Both types work on the same electromagnetic diaphragm principle and are serviced in essentially the same way, though the rebuild kits are specific to each model. Using the wrong kit produces results that are worse than not rebuilding it at all, so identify the pump before ordering parts.
How the electric pump works
The SU electric pump is an electromagnetic diaphragm pump. An electromagnet inside the pump body attracts the armature, pulling the flexible diaphragm downward. This creates a partial vacuum in the pumping chamber, drawing fuel in through the inlet valve from the tank. When the armature reaches the electromagnet, it trips the contact points. The points open, cutting power to the coil. A return spring immediately pushes the armature and diaphragm back upward, driving fuel through the outlet valve toward the carburettor. The points close again and the cycle repeats. Each cycle produces one tick.
The clever part is what happens as the carburettor float chamber fills up. Back-pressure builds in the fuel line. The diaphragm cannot return fully against this pressure, so the armature does not travel far enough to trip the points. The pump pauses. When the engine consumes enough fuel to reduce the pressure, the diaphragm returns, the points close, and the pump ticks again. This is why a healthy SU pump ticks quickly on first start and then slows to occasional ticks once the float chamber is full and the engine is running steadily. The tick is not merely characterful. It is diagnostic.
Testing the pump: reading the tick
The tick pattern tells you most of what you need to know before any tools come out. Turn the ignition on. The pump should start ticking immediately, run fairly quickly for a few seconds as it fills the float chamber, then settle to occasional slow ticks. This is normal. Healthy. Correct. Now consider the variants:
No tick at all: the pump is not operating. Either it has no power, the points have failed, the coil has burned out, or the armature has stuck in the energised position and cannot return to close the points. The last of these is more common than you might expect, particularly on a pump that has been sitting unused for some time. The armature corrodes slightly in place and refuses to move. The traditional remedy is a firm tap on the pump body with a rubber mallet or the handle of a screwdriver. This is not dignified, but it works often enough to have become standard practice. If tapping restores operation, the pump is telling you it needs a rebuild before the next time it decides to express the same sentiment at a less convenient location.
Rapid ticking that never slows: the pump is running continuously without building pressure. Possible causes include a cracked or perforated diaphragm (not generating suction), a failed inlet or outlet valve (not sealing properly between strokes), an air leak in the fuel supply line between tank and pump, or simply that the tank is empty. Check the tank first. It costs nothing.
Ticking but engine starves at speed: the pump is working at idle and light throttle but cannot keep up with demand at higher fuel consumption. This points to a partially blocked inlet filter inside the pump, a partially collapsed fuel supply hose that restricts flow under suction, a weakening diaphragm that can no longer maintain adequate stroke volume, or a partially failed valve. The filter is always the first thing to check. Rebuild kits include a new stainless steel mesh filter screen and there is no good reason not to replace it whenever the pump is opened.
Fuel smell or visible leak: a failed diaphragm is allowing fuel to pass into the pump body where it does not belong. In some cases fuel drips from the pump body. In others the smell alone is sufficient warning. Either way, this pump needs immediate attention. Running a car with a leaking fuel pump near a hot exhaust is not a situation that tends to end with a mild inconvenience.
The electrical checks
Before assuming the pump itself has failed, confirm it is receiving power. Measure voltage at the pump terminals with the ignition on. A healthy supply should be close to battery voltage. A significant drop (more than one volt) indicates resistance in the wiring or connectors, which is common on cars of this age where the original wiring has had several decades to oxidise at every connection point. The pump earths through its mounting body, so the earth path through the mounting bracket and bodywork is just as important as the positive feed. Run a temporary earth wire directly from the pump body to the battery negative and see whether performance improves before concluding the pump itself is at fault.
Rebuilding the pump
A full rebuild of an AUF300 or AZX1300 series pump is a genuinely achievable task with basic tools, a rebuild kit, a clean workbench, and the patience to photograph each stage before disassembly rather than afterward. The rebuild kit should contain a new diaphragm assembly, inlet and outlet valve discs, contact points, armature spring, inlet filter screen, and all necessary gaskets and seals. If the kit you have found does not include all of these, find a better kit. Holden Vintage and Classic, Moss Europe, SC Parts, and Rimmer Bros all supply appropriate kits. More on diaphragm material below, because this is important.
Start by disconnecting the battery and relieving fuel pressure: disconnect the outlet pipe and let any residual fuel drain into a container. Work in a ventilated space away from anything that produces a spark or an open flame. The pump contains fuel and the diaphragm, if failed, may have allowed fuel into the body. Treat it accordingly. Wipe the outside of the pump clean before opening it, because introducing grit into the valve chambers during disassembly is an effective way of ensuring the rebuilt pump fails immediately after installation.
Remove the screws around the top cover and lift off the cover and contact assembly carefully, noting the orientation of the electrical terminals. Mark them if there is any possibility of confusion. The armature and diaphragm assembly sits in the centre of the pump: remove the retaining circlip and lift out the armature, noting the spring beneath it and the order of any washers and spacers. The diaphragm is attached to the armature by a central threaded boss. On many AUF300 types the diaphragm and armature come out together as an assembly. Photograph everything before separating anything.
With the diaphragm removed, access the valve chamber. The inlet and outlet valve discs are small, flexible, and easy to confuse with each other. The inlet valve is usually slightly larger. Note which is which before removing them. Clean all metal components thoroughly with methylated spirits or a dedicated carburettor cleaner spray, checking the valve seats in the pump body for scoring or pitting. Light marks can be polished out; deep scoring means the pump body needs replacing, which is a less common but not unknown finding on high-mileage pumps.
Reassembly is the reverse of disassembly, which is a statement so obvious that it appears in almost every workshop guide and remains true regardless. Fit new valve discs, new diaphragm assembly, new contact points, new filter screen, and new gaskets. Do not reuse any rubber components from the original pump regardless of how sound they look. Tighten the cover screws evenly in a cross pattern to ensure the diaphragm seals properly around its perimeter. Reconnect, restore power, and listen for the tick.
E10 fuel and the SU pump: what you need to know
E10 petrol became the standard 95-octane fuel at UK forecourts in September 2021. It contains up to ten percent bioethanol. Ethanol is, among other things, a solvent. Original SU pump diaphragms and valve discs were made from natural rubber or early synthetic rubber compounds that were not designed to resist ethanol exposure. The consequence is predictable and, for owners who have not yet dealt with it, instructive: the rubber swells, softens, and eventually cracks or perforates. The diaphragm loses its flexibility and its ability to seal. The pump fails.
The failure is usually gradual rather than sudden, which in some respects makes it worse. The pump continues to work, but with reduced efficiency, for some time before the symptoms become obvious enough to diagnose. By the time the car is running lean at speed or refusing to start hot, the diaphragm has often been deteriorating for months. Continuous E10 exposure in a car that is driven regularly accelerates the process. Ethanol absorbs moisture from the atmosphere, and a pump that sits with E10 fuel in it during winter storage is both attacking its own rubber components and building up a water-contaminated fuel residue that will cause additional problems in spring.
The solution: diaphragm material matters
Modern replacement diaphragms are available in fluorosilicone (FVMQ) or Viton (FKM) synthetic rubber. Both offer excellent resistance to ethanol and will handle E10 indefinitely under normal conditions. The difference from the original material is not visible to the eye, but it is significant in service. When ordering a rebuild kit, confirm that the diaphragm and valve discs are Viton or fluorosilicone. If the supplier cannot tell you what material the diaphragm is made from, find a supplier who can. Cheap kits using standard nitrile rubber (NBR) are inadequate for E10 use and will fail faster than the original components they replaced.
The 97-octane “Super” grades at UK forecourts remain E5 (up to five percent ethanol) rather than E10, which makes them a preferable choice for classic cars. They cost slightly more per litre. So does a tow truck. The mathematics are straightforward.
Storage and E10
If the car is stored over winter, drain the fuel pump and carburettor before putting it away. The recommended method: fit a fuel tap in the supply line if one is not already there, close it, and run the engine until it stops from fuel starvation. This empties the pump and carburettor of E10 fuel, removing the static ethanol attack that would otherwise proceed quietly through the winter months. Refill with fresh fuel (E5 where possible) in spring. The HCVA (Historic and Classic Vehicles Alliance) recommends carrying a spare diaphragm when touring, which is advice worth taking seriously given that fitting one at the roadside takes fifteen minutes and costs about the same as a pint of decent beer.
The mounting orientation that everyone gets wrong
The SU electric pump must be mounted vertically, with the inlet port at the bottom. This is not a suggestion. It is a requirement of correct operation and the reason is mechanical: the armature relies partly on its own weight to assist the return spring in closing the contact points. Mount the pump horizontally and the armature cannot assist its own return, the tick becomes irregular, the pump loses efficiency, and the diaphragm wears prematurely. This is one of the most common installation errors on cars that have been badly repaired at some point in their history, and it explains a significant number of SU pumps that work intermittently and improve briefly when tapped before failing again.
On most standard installations the pump mounts vertically as a matter of course. On cars that have had replacement pumps fitted in non-standard locations, or where the pump bracket has been modified, it is worth confirming the orientation before diagnosing an intermittent pump fault. Turn the pump to vertical, retest, and see whether the symptoms resolve before opening anything up.
The mechanical SU pump
The mechanical SU pump is simpler in construction than the electric type: a camshaft-driven rocker arm operates the diaphragm directly, with no electrical components to fail. It lives on the engine block, runs whenever the engine runs, and is generally either working or not without the intermediate theatre of intermittent ticking and tap-to-restart that characterises the electric pump’s more communicative approach to failure.
The weak points are the same as the electric pump: diaphragm failure and valve failure. The E10 vulnerability is identical, and the same requirement for Viton or fluorosilicone replacement diaphragms applies. Testing is simple: disconnect the outlet pipe, crank the engine briefly, and confirm fuel is being delivered. No fuel with the engine cranking means either a failed diaphragm, blocked inlet, stuck valve, or a failed rocker arm mechanism. Disassembly follows the same photograph-everything principle, and rebuild kits are available for the main mechanical pump types from the standard suppliers.
One mechanical-pump-specific failure worth knowing: the sealing diaphragm between the fuel side and the oil side of the pump. On some mechanical pump designs, a secondary diaphragm prevents fuel from contaminating the engine oil if the main diaphragm fails. If this secondary seal fails, the symptoms are fuel in the oil (noticeable as a raised oil level with a petrol smell) rather than external leakage. The engine oil smelling of petrol on a mechanical-pump car is not a carburettor problem or an injector problem. It is the pump diaphragm, and it should be addressed before the diluted oil causes bearing damage.
Carry one. They are small, cheap, and the alternative is not.
A spare diaphragm for an SU pump costs a few pounds, fits in the bottom of a glovebox, and can be fitted at the roadside with basic tools in about twenty minutes once you have done it once. A complete spare pump, pre-rebuilt with E10-compatible components, costs around £30 to £50 from the main suppliers and eliminates even that twenty minutes. The SU pump has been remarkably reliable for over half a century. It responds well to maintenance and poorly to neglect. Give it the occasional inspection, use an E10-compatible rebuild kit when the time comes, mount it correctly, drain it before winter storage, and it will tick away contentedly for years without demanding further attention. Ignore all of that and it will still tick. Just less predictably, and quite possibly not from under the bonnet of your own car.
For related reading: our fuel system and E10 guide covers the full fuel system E10 implications beyond the pump, our SU carburettor setup guide covers the carburettor the pump feeds, our electrical fault finding guide covers the voltage drop and earthing tests relevant to any classic car electrical component, and our classic car breakdown kit guide covers what to carry including, as it happens, a spare fuel pump diaphragm.
This page contains affiliate links. If you click a link and make a purchase, Classic Car Hub may earn a small commission at no extra cost to you.