Brake fluid does one job: it transmits the force from your foot, through the master cylinder, through the hydraulic lines, and into the callipers and wheel cylinders that actually stop the car. It does this job silently and invisibly, requiring no attention from the driver, right up until the moment it boils. When hydraulic brake fluid boils it turns to vapour. Vapour compresses where as fluid does not. The pedal goes to the floor. The car does not stop as requested. This experience concentrates the mind considerably, and the correct response to it is to change the fluid on a sensible schedule so that it never happens rather than to discover the wet boiling point of degraded three-year-old DOT 3 personally, at the bottom of a steep hill, in traffic.
This guide covers everything about brake fluid for classic car owners: what the DOT numbers mean, which number actually matters, the silicone versus conventional debate in honest terms, what to do with a bottle of the wrong stuff already in the system, how to recognise fluid that has gone past its useful life, and how to bleed the system correctly including the lesser-known techniques that work when the standard method does not.
Why brake fluid degrades: the hygroscopic problem
Glycol-based brake fluid (DOT 3, DOT 4, and DOT 5.1) is hygroscopic: it absorbs moisture from the atmosphere. This happens through the rubber hoses in the system, through the reservoir cap seal, and whenever the system is opened for any reason. The rate of absorption varies by fluid grade and by climate, but as a general figure DOT 3 fluid absorbs approximately 2 percent water per year in normal conditions. This matters because water in brake fluid reduces the boiling point. Fresh DOT 3 fluid has a minimum dry boiling point of 205 degrees Celsius. The same fluid after two years of moisture absorption has a wet boiling point of approximately 140 degrees Celsius. That 65-degree difference is the gap between fluid that works under sustained braking and fluid that turns to vapour on the way down a hill and leaves the driver with a different kind of problem to think about.
The practical consequence for classic car owners: the question is not whether the brake fluid needs changing but how frequently. The answer is every two years regardless of mileage, because it is time and atmospheric exposure rather than distance that degrades glycol fluid. A classic car that has covered 500 miles in two years on the same fluid has degraded fluid. The mileage is irrelevant to the chemistry.
DOT ratings explained
The DOT number is a United States Department of Transportation designation that sets minimum performance standards for brake fluid, principally for boiling points. It is a minimum standard, not a recipe: manufacturers can and do exceed the minimums, which means a quality DOT 4 fluid from a reputable supplier can have higher boiling points than some DOT 5.1 fluids. The number alone does not tell the full story about any specific product, though it does establish the floor below which no conforming product can fall.
| Grade | Base chemistry | Dry boiling point (min) | Wet boiling point (min) | Compatible with |
|---|---|---|---|---|
| DOT 3 | Glycol ether | 205°C (401°F) | 140°C (284°F) | DOT 4, DOT 5.1 |
| DOT 4 | Glycol ether / borate ester | 230°C (446°F) | 155°C (311°F) | DOT 3, DOT 5.1 |
| DOT 5 | Silicone | 260°C (500°F) | 180°C (356°F) | Nothing else. At all. |
| DOT 5.1 | Glycol ether / borate ester | 260°C (500°F) | 180°C (356°F) | DOT 3, DOT 4 |
One point in the table requires specific emphasis before moving on: DOT 5.1 is not silicone. The numbering implies a progression from DOT 3 through to DOT 5.1 as though each grade is an improvement on the last, but DOT 5 broke from the glycol family entirely and is a completely different chemical system. DOT 5.1 returned to glycol chemistry and should more logically have been called DOT 4+ or DOT 4 Racing. It was not. The result is that a significant proportion of classic car owners who hear “DOT 5.1” assume it is a silicone fluid, mix it with the glycol fluid already in the system, and discover that glycol and silicone fluids do not get along. They phase-separate, attack seals, and produce hydraulic unpredictability at exactly the speed at which hydraulic unpredictability is most unwelcome. DOT 5.1 is glycol. DOT 5 is silicone. The dot one is not a decimal; it is the number five followed by the number one, which the Department of Transportation believed was an intuitive naming convention.
The wet boiling point: the number that actually matters
The dry boiling point is measured on fresh fluid straight from a sealed container. The wet boiling point is measured on fluid that has absorbed 3.7 percent water, which is a controlled approximation of what happens to fluid in real use over time. The wet boiling point is the number that describes what the fluid is actually doing after it has been in the system for a year or two, and it is consistently and significantly lower than the dry boiling point for every glycol grade.
DOT 3’s wet boiling point minimum of 140 degrees is worth knowing because it is the temperature at which classic car brake fluid under sustained use from a driver who has not changed the fluid in three years can turn to vapour in the callipers. The disc or drum temperature at that point does not need to be exotic: a loaded car on a long downhill gradient with the brakes applied intermittently generates sustained heat that reaches callipers and wheels cylinders. This is not a competition scenario. It is an ordinary road scenario on a car with neglected fluid.
Upgrading from DOT 3 to DOT 4 on a classic car that specifies DOT 3 is generally acceptable: DOT 4 is compatible with DOT 3 and provides meaningfully better wet boiling point margins. Check the workshop manual for the specific car before doing this, as a small number of older systems with specific seal materials prefer DOT 3, but most classic British cars are happy with DOT 4. The reverse upgrade, putting DOT 3 into a system that specifies DOT 4, lowers the blended boiling point below the DOT 4 minimum and is not advisable.
The silicone debate: the honest version
DOT 5 silicone fluid generates strong opinions in the classic car community, most of them in favour, many of them based on two genuine advantages that are then used to justify a conclusion the evidence does not fully support. The genuine advantages are these: silicone fluid does not absorb moisture, so its boiling point does not degrade over time, and silicone fluid does not strip paint if spilled on a body panel. Both of these are real and significant benefits, and for a specific category of classic car they make silicone a sensible choice.
The disadvantages are less frequently discussed. Silicone fluid is more compressible than glycol fluid, which produces a measurably spongier pedal feel. This is not dramatic but it is perceptible, and on a classic car whose braking distances are already more generous than a modern vehicle, a spongier pedal is not an improvement. More importantly, silicone fluid does not disperse moisture: because it is hydrophobic, any water that enters the system does not dissolve into the fluid and get carried away, but pools at the lowest point. Pooled water causes localised corrosion inside callipers, wheel cylinders, and brake pipes at the lowest points of the system. A caliper with a pool of water sitting in it rusts internally in a way that glycol fluid, which absorbs and disperses the same water throughout the system, would not cause. This is not a theoretical risk: it is the specific failure mode of silicone fluid in systems that are not completely sealed.
The other disadvantage is the conversion requirement. Silicone and glycol fluids cannot be mixed. Converting a system from glycol to silicone requires removing every rubber component in the braking system (hoses, master cylinder seals, caliper seals, wheel cylinder seals), replacing them all with silicone-compatible equivalents, and flushing the system completely before the silicone fluid goes in. Any glycol residue remaining in the system will react with the silicone. This is not a half-afternoon job.
The honest recommendation: silicone fluid is appropriate for cars that are stored for extended periods and used rarely, where the non-hygroscopic property prevents the boiling point degradation that occurs with glycol sitting in a stored car for years. It is also appropriate for concours cars where spill risk to paint is a specific concern. For a regularly driven classic that will receive the two-year fluid change it should be getting anyway, DOT 4 glycol fluid changed on schedule provides better pedal feel, no paint-stripping risk with sensible care, and none of the pooled water corrosion risk. The silicone advantage only applies to cars that are not being maintained to the schedule that glycol fluid requires. Maintain the schedule, use glycol.
One more thing about glycol fluid and paint
Glycol brake fluid removes paint from bodywork with the quiet efficiency of a purpose-built stripping agent. This is not mentioned prominently on the bottle, which seems like an oversight. The discovery is usually made when overfilling the reservoir results in a small overflow that runs down the master cylinder and onto the wing, and the owner returns after twenty minutes to find a de-painted patch that was not there when they started. The correct response is to wash spilled fluid off immediately with large quantities of water. The correct pre-emptive response is to place rags around the master cylinder before opening the reservoir cap. The response of staring at the de-painted patch and wondering how quickly it can be polished away before anyone notices does not work, but it is widely attempted.
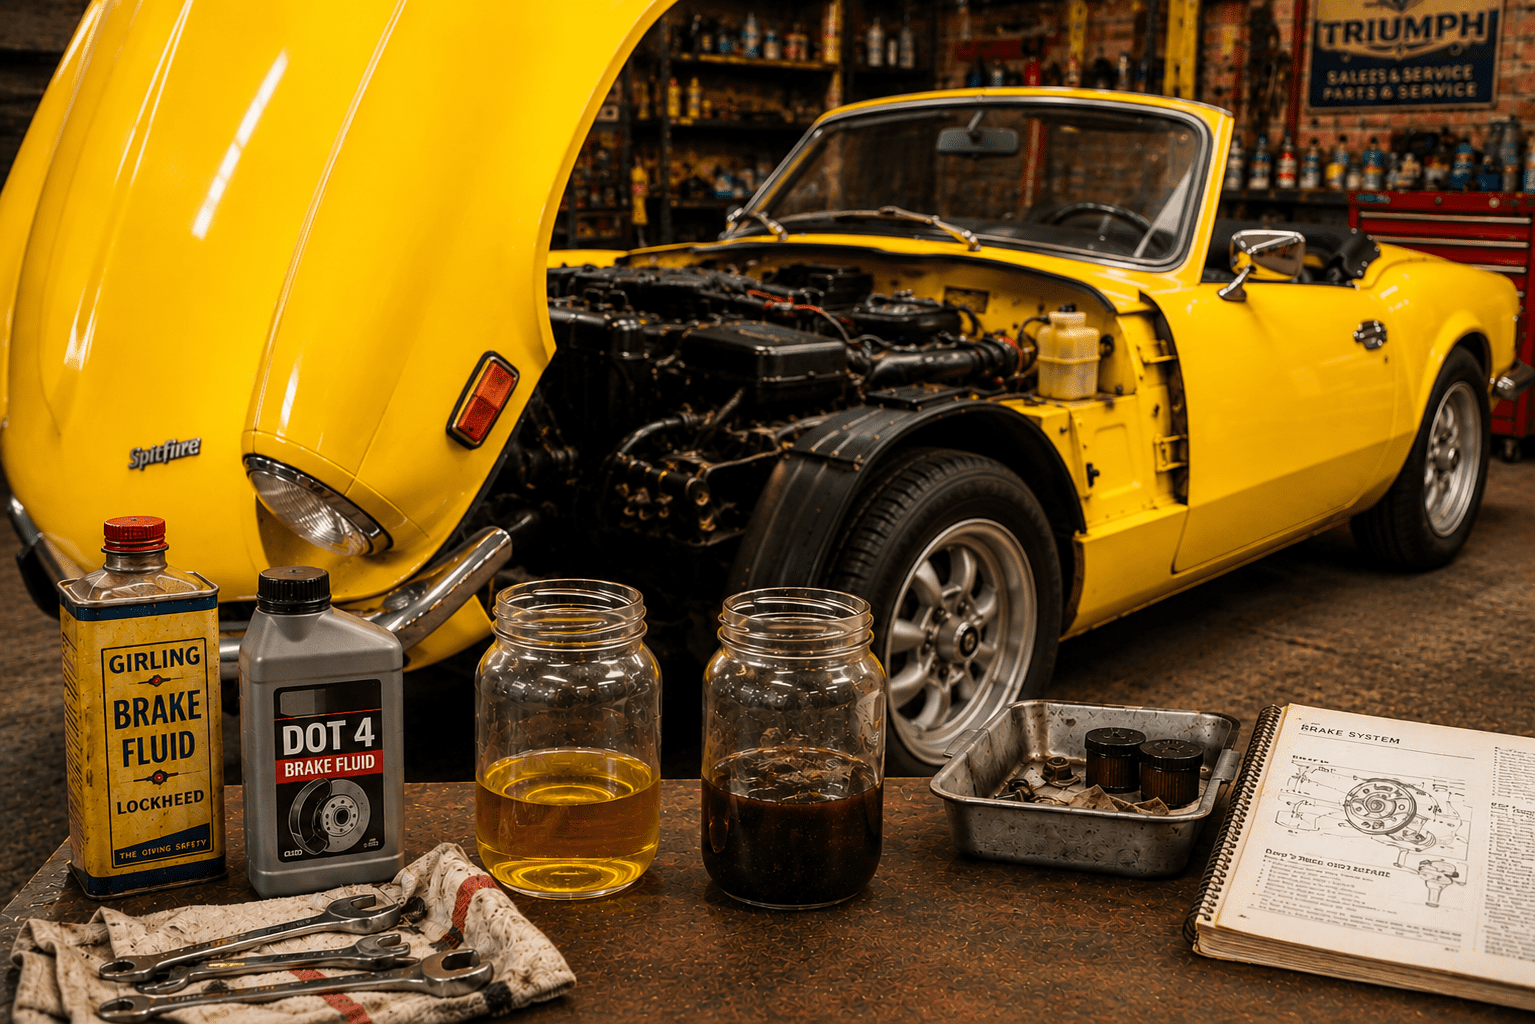
Recognising contaminated fluid
Fresh DOT 3 or DOT 4 fluid from a new container is clear to very pale yellow. This is the reference point against which what comes out of the bleed nipple should be compared. The condition of the fluid leaving the bleed nipple during a service tells a story about what has been happening inside the system.
Dark brown to black fluid: normal degradation from moisture absorption, heat cycling, and rubber particles from ageing seals. The colour indicates the fluid is overdue for replacement but does not indicate a specific mechanical problem. Change the fluid, bleed thoroughly, and monitor the new fluid’s condition at the next service.
Rust particles in the fluid: internal corrosion somewhere in the system. On a classic car this most often indicates caliper or wheel cylinder corrosion, or rust from the inside of steel brake pipes. The fluid must be completely flushed, the source of the rust identified, and the corroded component repaired or replaced. Running a system with rust particles means those particles pass through the master cylinder and accumulate against the seals, accelerating seal wear. It also means the rust source is getting worse.
Milky or cloudy appearance: significant water contamination beyond normal moisture absorption. This indicates either a seal failure allowing water ingress or, in some specific cases, a failed master cylinder with water from an external source reaching the hydraulic fluid. Flush and replace entirely. Do not attempt to restore milky fluid by topping up.
Oily or greasy fluid, or fluid with an oily floating layer: petroleum contamination. This is the most serious finding and requires complete disassembly, flushing, and replacement of all rubber components. Petroleum-based products (engine oil, gear oil, WD-40, grease) cause glycol-compatible seals to swell catastrophically. A single incident of petroleum contamination, even a small amount, has been known to render a master cylinder unable to hold pressure within miles. The most common source on a classic car is a well-meaning but uninformed previous owner who sprayed WD-40 into the reservoir believing it to be a lubricant, which it is, but not one that belongs anywhere near hydraulic brake fluid.
Bleeding the system: sequences and methods
The standard bleeding sequence on most classic British cars is to start at the wheel furthest from the master cylinder and work toward it. On a right-hand-drive car with the master cylinder on the driver’s side, this means: rear offside (right rear), rear nearside (left rear), front offside (right front), front nearside (left front). Check the workshop manual for the specific car: the hydraulic plumbing on some applications routes differently and the sequence follows the plumbing, not a general principle.
Before touching a bleed nipple on a classic car that has not been opened recently, apply penetrating oil to the nipple and allow it to soak. Bleed nipples on classic British cars that have been in place since 1967 are made of brass in a steel or cast iron housing, and turning one without preparation removes the nipple head in a way that turns a routine fluid change into a significant caliper or wheel cylinder replacement project. Soak overnight with Plusgas if time allows. Apply heat from a blowtorch to the surrounding metal (not the rubber hose) if the penetrating oil alone is insufficient. If the nipple shows signs of movement but then stops, stop turning and soak further. The first sign of resistance from a nipple that should be turning is worth heeding. The second sign is usually the sound of the head shearing.
Two-person bleeding
The standard method: one person at the reservoir to maintain fluid level and one person at each nipple in sequence. The reservoir person must keep the fluid level above the minimum at all times: running the reservoir dry introduces air directly into the master cylinder and requires the entire system to be bled again from the top, which is frustrating in a way that is disproportionate to its severity but entirely understandable given the circumstances.
Technique at the nipple: attach a clear plastic hose to the nipple and route the hose into a jar with a small amount of clean fluid in the bottom (the end of the hose should be submerged in the fluid, which prevents air being drawn back through the hose during the return stroke). Open the nipple half to three-quarters of a turn. The person at the pedal pushes slowly to the floor. The nipple person watches the hose for fluid and air bubbles. When the pedal is at the floor, close the nipple before the pedal is released. This is the only step that cannot be skipped: releasing the pedal with the nipple open draws air back into the caliper, which negates the entire stroke. Once the pedal is released, the nipple person nods. The pedal person releases and pumps once more. Repeat until the fluid in the hose is clear and bubble-free. A minimum of six to eight strokes is usual on a system being fully refreshed.
Gravity bleeding
Gravity bleeding requires no assistant and no technique beyond patience. Fill the reservoir to the maximum mark. Open all four bleed nipples by half a turn. Allow gravity and the head of fluid in the reservoir to push fluid through the system. Monitor the reservoir every five to ten minutes and top up before it falls below the minimum. As air rises and fluid flows, bubbles appear at each nipple and gradually cease. The process takes longer than the two-person method, typically twenty to thirty minutes for a full system flush, but introduces no additional air from poor technique at the pedal. Close each nipple once flow is steady and bubble-free. Gravity bleeding is the technique that tends to work when the two-person method has been producing inconsistent results and the assistant is beginning to express an opinion about how long this is taking.
Pressure and vacuum methods
The Eezibleed and Gunson’s pressure bleeding kits connect to the reservoir cap and use tyre pressure (typically 0.3 bar or 5 psi) to push fluid through the system, allowing a single person to bleed at the nipple without an assistant at the pedal. Effective and consistent when used correctly. Do not exceed the specified pressure: the reservoir on a classic car is not designed for more than minimal pressure and the cap seal on an old reservoir may not be in a condition to contain it. A reservoir cap that fails under pressure deposits fluid over the engine bay in a way that is both dramatic and damaging to paint, wiring, and the operator’s calm.
Vacuum bleeding kits (Mityvac and similar) draw fluid through the system by applying suction at the bleed nipple. Effective but with one specific limitation on classic cars: the bleed nipple thread is not designed to be air-tight under vacuum. A slight air leak past the nipple thread will draw small bubbles into the bleed hose that look like air in the system but are actually atmospheric air entering through the nipple threads rather than system air. This produces the confusing result of a system that appears to be bleeding indefinitely with no improvement in pedal feel. Wrapping the bleed nipple threads with a single layer of PTFE tape before fitting the vacuum adaptor addresses this on most applications.
The niche tips worth knowing
Never reuse drained brake fluid. Even fluid that looks clean has absorbed moisture to some degree. The investment in fresh fluid from a sealed container is not the place to economise.
Never use fluid from a part-used container that has been open for more than six months. Brake fluid in an open container absorbs moisture from the air. The half-bottle on the shelf from the last service two years ago has been doing exactly this since the first service was completed. Use a fresh sealed container for every fluid change.
After a full fluid change, perform the thirty-second pedal test. Press the brake pedal firmly and hold it for thirty seconds. A pedal that remains firm throughout indicates a sealed system with no air and no failing components. A pedal that sinks slowly indicates either air remaining in the system, a failing master cylinder seal, or a weeping connection. A pedal that sinks rapidly indicates a significant leak. Find the problem before driving the car.
On systems where the clutch and brakes share a reservoir (MGB, Triumph TR series, and others), bleeding the brakes and running the reservoir low affects the clutch hydraulic system simultaneously. Never run the reservoir down far enough to introduce air into the clutch circuit while working on the brakes, and bleed the clutch separately if any doubt exists about whether air has been introduced.
The correct way to check if a bleed nipple is open or closed without tightening it fully to check for resistance: observe the clear bleed hose. If fluid flows and the pedal produces movement in the hose, the nipple is open. If nothing moves regardless of pedal input, the nipple is closed or the passage is blocked. Do not rely on the feel of the nipple itself on a corroded unit where the difference between open and closed may be less than half a turn and the nipple may feel similar throughout its range.
For related reading: our classic car brakes guide covers the complete braking system including disc and drum servicing, our clutch guide covers the shared reservoir implications for clutch bleeding, our workshop safety guide covers the safe handling of brake fluid including the paint-stripping hazard, and our springtime safety check includes brake fluid condition as a standard annual inspection item.
This page contains affiliate links. If you click a link and make a purchase, Classic Car Hub may earn a small commission at no extra cost to you.