There is a sound that every classic car owner recognises and none of them enjoy. A rhythmic ticking, tapping, or clattering from the top of the engine that was not there last week and is now rather insistently there this week. Sometimes it develops gradually. Sometimes it appears overnight, as if the engine has decided to begin expressing its feelings. The cause, more often than not, is valve clearances that have drifted out of specification. The remedy is one of the most satisfying and genuinely accessible tasks in classic car maintenance: adjusting the tappets. It requires no specialist equipment, no particular skill beyond patience, and a workshop manual that tells you what the clearances should actually be. This guide covers how to do it correctly, which tools make it easier, and what the numbers on the feeler gauge actually mean.
Why clearances matter
The valve clearance, also called tappet clearance or valve lash, is the small gap between the tip of the valve stem and the rocker arm that opens it. This gap exists for one very specific reason: metal expands when it heats up. When the engine is running at normal operating temperature, the valve stems, pushrods, and rocker arms have all grown slightly longer than they were when cold. The clearance is there to ensure that even after this thermal expansion has occurred, the valves still close fully against their seats. Without it, the valves would be held fractionally open by the expanded valve train, unable to seal the combustion chamber properly. The result is a burnt valve seat, lost compression, and the kind of internal damage that makes engine rebuilds seem like an attractive proposition compared to the alternative of having started the whole business earlier.
Exhaust valves typically run considerably hotter than inlet valves, because they are exposed to combustion gases on every cycle. They expand more. This is why the exhaust valve clearance is usually specified as slightly larger than the inlet clearance on most classic engines. Not by much. But the difference is deliberate and should be observed rather than treated as an unnecessary complication. The workshop manual is correct on this point.
How clearances change over time
On a healthy engine with unworn valve train components, clearances are fairly stable. They may tighten slightly as valve seats bed in on a freshly rebuilt engine. On an older engine with mileage on it, the wear patterns on rocker tips, valve stem tops, and pushrods mean the clearances can drift in either direction depending on where the wear is. A ticking engine usually has clearances that have opened up beyond the specified maximum. A running engine with tight clearances often runs quietly right up until the moment the valves stop sealing properly, which is a rather dramatic way to discover the problem. Quiet does not always mean correct. Check the clearances at every major service and whenever the rocker cover is off for any other reason.
Hot or cold?
Some engines specify clearances set with the engine hot, others cold. The difference on most classic British engines is smaller than the debate might suggest. On a B-Series MGB engine, for example, the hot specification is 0.013 inches and the equivalent cold setting is approximately 0.015 inches, a difference of just two thousandths of an inch. In practice, if the workshop manual specifies hot adjustment, take the car for a gentle warm-up run, switch off, and work quickly before the engine cools significantly. If it specifies cold, simply ensure the engine has been standing for at least a couple of hours. Always follow your specific manual rather than general advice, because some engines behave differently and aluminium-headed cars in particular may have specific requirements. When in doubt, check the workshop manual. When still in doubt, check it again.
What you need
The workshop manual
The single most important item on this list. Every classic engine has specific clearance specifications, and using figures from memory, from a forum, or from a well-meaning friend at a show is not the same as reading the number from the book written for that exact engine. The correct clearances for a standard cam are in the manual. If a performance camshaft has been fitted, use the cam manufacturer’s specified clearances instead, which are usually wider than standard and should always take priority over the standard specification. A Piper or Kent performance cam will have its own clearance requirements, often printed on a card supplied with the camshaft. Keep that card.
Feeler gauges
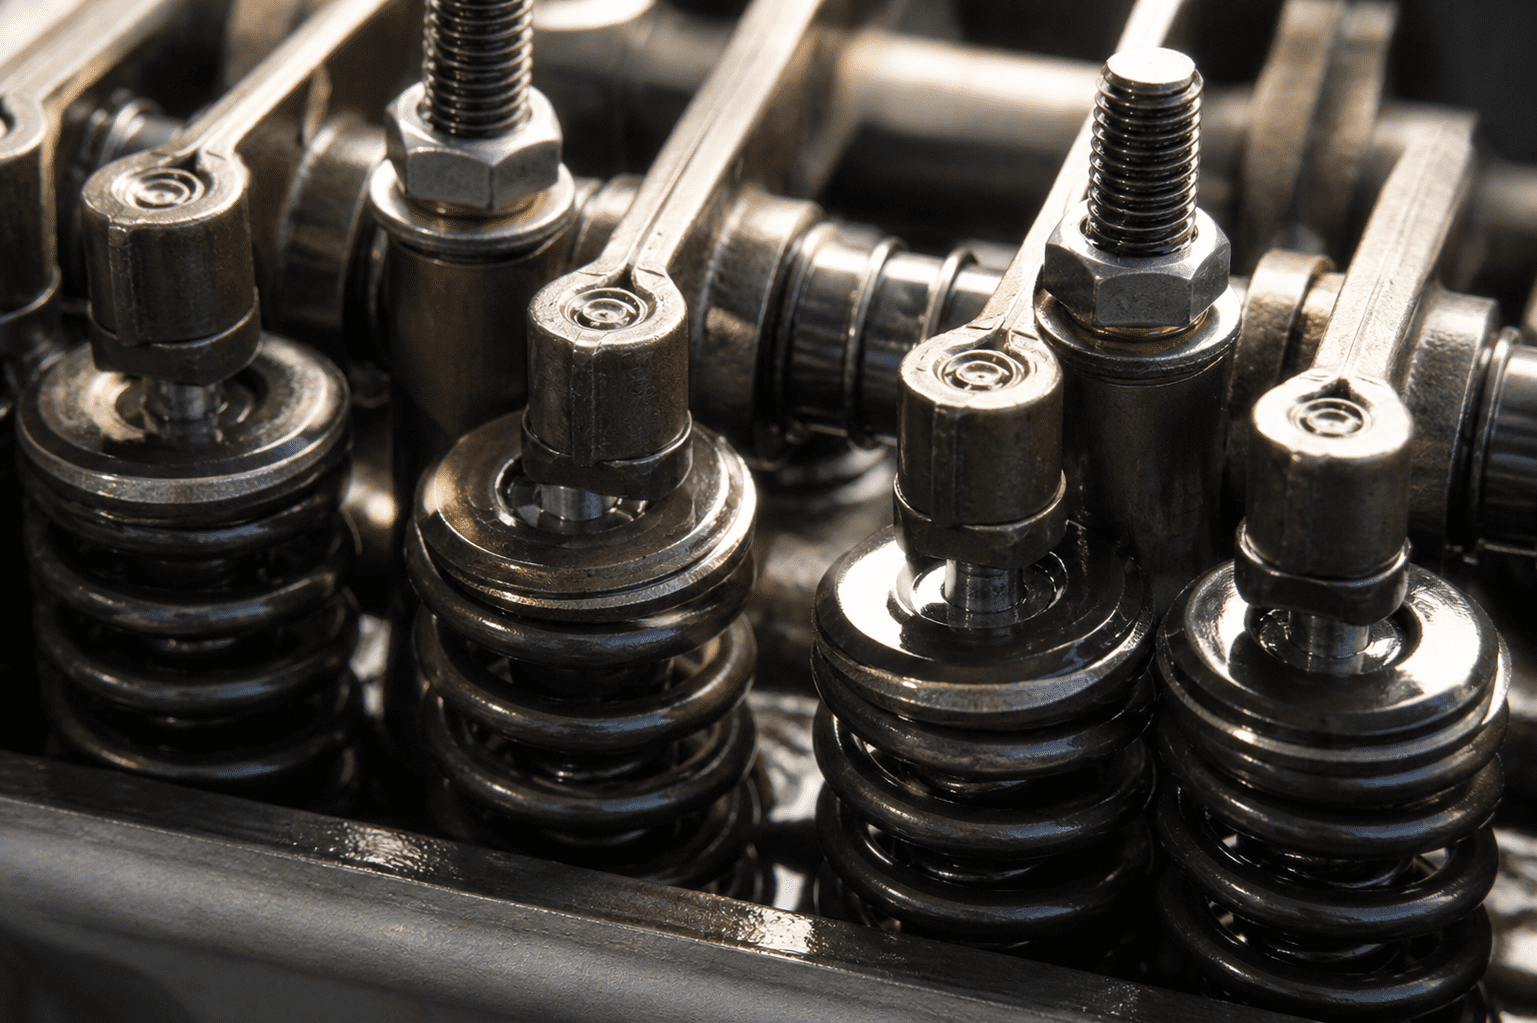
A good set of feeler gauges is the fundamental tool for tappet adjustment. The blades should be clean, flat, and in good condition. A bent or nicked blade gives an inaccurate reading, which rather defeats the point. The correct technique is to select the blade corresponding to your specified clearance and slide it between the rocker and the valve stem. At the correct clearance, the blade should pass through with a light but definite resistance, a sensation sometimes described as a slight drag. It should not pass freely, which indicates the gap is too large. It should not require forcing, which indicates the gap is too small. The distinction between these three states is something you develop a feel for quickly, and it is genuinely a feel rather than a measurement, which is both slightly imprecise and entirely normal for the job.
One limitation of feeler gauges on older engines is worth knowing about. On a heavily worn rocker tip, the face has often worn into a concave shape rather than remaining flat. A feeler gauge blade, being flat, will bridge across the edges of this cup rather than measuring the true clearance at the centre. The reading you get is therefore larger than the actual clearance at the deepest point. This is the reason the Clickadjust tool was developed, and why worn rocker tips ideally should be refaced or the rockers replaced before setting clearances on a high-mileage engine.
The Clickadjust tool
The Clickadjust, also sold under the Gunson name, is a British tool that combines a socket for the locknut and a screwdriver for the adjuster into a single device, and sets the clearance by measuring the number of turns of the adjuster screw rather than using a feeler gauge. The principle is straightforward: wind the adjuster down until there is zero clearance at the valve, then back it off by a precise number of clicks corresponding to the required gap, based on the thread pitch of the adjuster screw. Because it works from zero clearance upward rather than trying to measure the gap directly, it is less affected by wear on the rocker face than a plain feeler gauge.
The Clickadjust requires initial calibration using two feeler gauges of known sizes to establish what each click corresponds to for the adjuster thread on your specific engine. It is supplied with a card giving click counts for common thread pitches. The tool is particularly well regarded for A-series engines and B-Series MGB engines. It is not suitable for every engine and the instructions should be read before use rather than after the first unsuccessful attempt. It does not replace feeler gauges entirely: feeler gauges are still needed for initial calibration and for engines with non-standard adjuster threads. It is, however, a genuine improvement in ergonomics, because the standard combination of screwdriver, ring spanner, and feeler gauge normally requires what experienced mechanics describe as three hands, and most people only have two.
Ring spanner and screwdriver
If you are using the traditional method without a Clickadjust, you need an appropriate ring spanner for the locknut and a flat-bladed screwdriver for the adjuster. A ring spanner is strongly preferable to an open-ended spanner because it grips the full hexagon of the locknut rather than two flats, reducing the risk of rounding it off. A rounded locknut on a tappet adjuster is an entirely avoidable problem that nevertheless happens with remarkable frequency to people who use open-ended spanners on locknuts. Use the ring spanner.
Torque wrench for the rocker cover
When refitting the rocker cover, a torque wrench prevents overtightening the cover retaining bolts or nuts. Overtightened rocker cover fixings on aluminium heads strip the threads. Overtightened fixings on pressed steel covers distort the sealing flange. Either outcome produces an oil leak that was not there before you started, which is a demoralising result after an otherwise successful tappet adjustment.
Common specifications for classic engines
These are widely accepted standard cam specifications for reference. Always verify against your specific workshop manual and use the cam manufacturer’s specification if a performance camshaft is fitted.
| Engine | Inlet clearance | Exhaust clearance | When to set |
|---|---|---|---|
| BMC/Rover A-Series (Mini, Midget, Sprite) | 0.012 in (0.30 mm) | 0.012 in (0.30 mm) | Cold |
| MGB B-Series 1.8 | 0.015 in (0.38 mm) | 0.015 in (0.38 mm) | Cold |
| Ford Kent Crossflow 1.6 | 0.014 in (0.35 mm) | 0.018 in (0.45 mm) | Cold |
| Triumph 1300/1500 (Spitfire, Herald) | 0.010 in (0.25 mm) | 0.010 in (0.25 mm) | Cold |
| Triumph 2000/2500 straight-six | 0.010 in (0.25 mm) | 0.010 in (0.25 mm) | Cold |
These figures are for standard camshafts in standard specification engines. They are a starting point, not a substitute for the workshop manual. Performance camshafts almost always specify wider clearances than standard, sometimes considerably wider on high-lift aggressive profiles.
The rule of nine
On a four-cylinder, eight-valve engine, the rule of nine is the standard method for determining which valve to adjust when. The principle is simple. Number the valves one to eight from the front of the engine. When any valve is fully open, its paired valve (the one whose number adds to nine with it) is fully closed and ready to be adjusted. When valve eight is fully open, adjust valve one. When valve seven is fully open, adjust valve two. And so on: six and three, five and four. Work through each pair in sequence by turning the engine over between each adjustment. Removing the spark plugs first makes turning the engine by hand considerably easier, since there is no compression to overcome. Engaging a gear and rocking the car forward and back is the method if no suitable tool is available for the crankshaft pulley.
On six-cylinder engines the same principle applies but the numbering runs to twelve (two valves per cylinder, six cylinders), and the paired numbers add to thirteen rather than nine. Check the workshop manual for the specific sequence, as firing orders vary and the sequence in which the valves should be adjusted follows the firing order rather than a simple numerical progression.
The adjustment procedure
With the engine prepared as above and the rocker cover removed, work through each valve in sequence.
- Identify the correct valve to adjust: turn the engine until the paired valve is fully open (the rocker is fully depressed). The valve you are about to adjust should be fully closed with the rocker sitting at rest.
- Check the existing clearance: slide the correct feeler gauge blade between the rocker and the valve stem tip. Note whether the gap is within specification, too large, or too small.
- Slacken the locknut: using the ring spanner, loosen the locknut on the adjuster screw by half a turn or so. One hand holds the spanner, the other holds the screwdriver in the adjuster slot to prevent it turning.
- Set the clearance: with the feeler gauge blade in place, turn the adjuster screw until the blade is a light sliding fit. Too much drag means the gap is too tight. Blade passes freely means the gap is too large. The correct feel is a definite but not excessive resistance.
- Lock the adjuster: holding the screwdriver firmly to prevent the adjuster rotating, tighten the locknut with the ring spanner. This is where most errors happen: the act of tightening the locknut has a tendency to rotate the adjuster slightly, closing the gap. Check the clearance again with the feeler gauge after tightening. If it has changed, slacken and repeat.
- Re-check after locking: this step is not optional. The clearance after locking is what matters, not the clearance before. They are not always the same. Re-check every valve after the locknut is tightened.
- Move to the next pair: turn the engine to bring the next valve to the fully open position and repeat the process.
After adjustment
Before refitting the rocker cover, wipe the mating faces clean of old gasket material and oil. Fit a new rocker cover gasket rather than reusing the old one, which will have compressed and is unlikely to seal properly a second time. If the gasket is a cork item, applying a thin smear of gasket sealant to both faces is worthwhile. A rubber gasket should seat without sealant provided the mating faces are clean and the cover is not distorted.
Refit the cover and tighten the fixings evenly in a diagonal sequence to a modest torque. Finger tight plus a quarter turn is the right idea for most rocker cover fixings. When the engine is started, a brief period of slightly elevated tappet noise is normal as oil redistributes through the valve train. This should settle within a minute or so. If the noise is substantially worse than before adjustment, or if individual tappets sound dramatically different from others, stop the engine and recheck. One incorrectly set valve is considerably less embarrassing to find immediately than after a further hundred miles.
A correctly adjusted engine should settle to a modest, even background tick at idle. The complete elimination of all valve train noise is not necessarily the goal. A healthy classic engine ticks quietly. A classic engine that has been overtightened into apparent silence often has valves that are not closing fully, which is a rather costly form of peace and quiet. Set the clearances to specification and accept the gentle percussion that comes with it. It is not a fault. It is the sound of a correctly maintained engine doing exactly what it was designed to do.
If you have recently fitted roller rockers and want to understand how they change the valve train dynamics, our roller rockers upgrade guide covers the differences in detail. For the full engine inspection routine as part of a seasonal check, our pre-season safety check guide includes tappet noise as one of the key things to listen for when bringing a classic out of storage. And if the SU carburettors need attention at the same service interval, which they often do, our SU carburettor guide covers setup and tuning in the same practical spirit.
This page contains affiliate links. If you click a link and make a purchase, Classic Car Hub may earn a small commission at no extra cost to you.