Plastic body filler has been the restoration go-to since the 1960s and for most jobs it does perfectly well. But there are situations where lead is the right material and filler is the wrong one, and experienced restorers know the difference. Seams, joints, and areas where two panels meet are where lead loading genuinely earns its place. Lead bonds to the metal rather than just sitting on top of it, it flows into crevices and seams by capillary action, it expands and contracts at a rate similar to steel, and when done properly it is genuinely invisible under paint. The factory used it for exactly these reasons. If you are doing a proper restoration, learning to use lead is worth the effort.
Safety first: lead is toxic
Before anything else, the safety information. Lead is a cumulative poison that the body does not eliminate efficiently. The risks in lead loading come primarily from lead dust during filing and sanding, and from lead fumes if the metal is overheated. Both are manageable with the right precautions, but neither should be taken lightly.
Always work in a well ventilated area. Wear a properly rated respirator, not a paper dust mask, when filing or sanding lead. Nitrile gloves should be worn throughout. Do not eat, drink or smoke while working with lead. Wash hands thoroughly before eating or drinking. Keep children away from the work area. Collect any lead filings and shavings rather than leaving them on the floor, an aluminium tape barrier fixed below the work area will catch most of what falls. Dispose of lead waste responsibly rather than putting it in general rubbish.
Overheating lead produces toxic fumes. The aim during application is to work in the pasty range, where the lead is soft but not liquid. If you see the lead becoming very fluid and running freely, the temperature is too high. Back off the heat immediately.
What lead loading is and where to use it
Lead loading, also called body soldering or lead wiping, uses a tin and lead alloy with a relatively wide plastic working range. Unlike pure tin solder which goes from solid to liquid almost instantaneously, body solder passes through a semi-solid pasty state at an intermediate temperature. It is in this pasty state that the lead can be worked and shaped with a wooden paddle, which is what makes the technique possible.
The technique is particularly well suited to seams and joints where two panels are welded or brazed together and a smooth continuation of the body surface is needed. Panel seams on door pillars, the joints where front wings meet the scuttle, and body seams at the base of windscreen pillars are classic lead loading applications on British cars of the 1950s, 60s and 70s. The factory used lead extensively in these areas and you will often find the original lead still in place under layers of paint on unrestored cars. Where a seam is being repaired or the original lead has been damaged or removed, re-leading is the correct approach for a proper restoration.
Lead is not the right material for filling dents in flat or gently curved panels. That is what plastic filler is for and plastic filler does it very well. Lead is for seams, joints, and areas where the material needs to flow into a crevice and bond as part of the structure rather than just filling a surface depression.
What you will need
The basic equipment for lead loading is not extensive. You will need body solder, which is typically a 70/30 or 60/40 tin-lead alloy available in stick form from automotive restoration suppliers. You will need tinning paste, also called solder paint or flux paste, which is an acid flux with fine solder particles suspended in it. This is used to prepare the surface and tin it before the main application. You will need tallow or a similar non-contaminating lubricant for the wooden paddle. You will need wooden paddles in flat and shaped profiles for working the lead. You will need a heat source, either an oxy-acetylene torch turned well down, a butane torch, or a hot air gun. Of these, the hot air gun is the most controllable and forgiving for beginners. You will need a body file for finishing, and coarse wet and dry paper.
Do not attempt lead loading with a standard soldering iron or a cheap torch that does not give you control over the heat output. Overheating is the most common mistake and the most dangerous. A hot air gun of the type used for paint stripping, set to a moderate temperature, gives excellent control and is the recommended starting point for anyone new to the technique.
Preparation: the most important part
Lead will not bond to contaminated metal. This is not a minor inconvenience, it is a fundamental property of the material. Any trace of paint, rust, grease, oil, or surface contamination will prevent the lead from tinning properly, and without proper tinning the lead will not adhere and will simply fall off when it cools. The preparation has to be thorough.
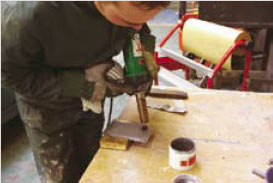
Strip the paint from a generous area around the repair. For a seam repair this means bare metal for at least 50mm either side of where the lead will be applied. A DA sander or angle grinder with a stripping disc will remove paint from flat areas quickly.
Wire wheel attachments on an angle grinder are useful for getting into seams and crevices where paint and surface rust accumulate. The metal must be clean, bright and dry before the tinning process begins.
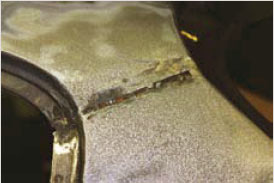
For seam repairs, getting the crevice itself clean is particularly important. The lead works into the seam by capillary action when heat is applied, and if the seam contains rust or contamination the bond will be poor. A small wire wheel or pointed wire brush working along the length of the seam is the best approach. Take the time to do this properly. Rushing the preparation is the single most reliable way to produce a lead repair that falls out six months later.
Tinning the surface
Tinning is the process of bonding a thin layer of solder to the prepared metal surface, which gives the subsequent lead applications something to grip to. Without tinning, the lead will not bond, full stop.
Before working on the car itself, practice on a piece of scrap metal to get the feel for how the heat source behaves and how the lead responds at different temperatures. Vertical panels are particularly challenging as the lead will run downward if it gets too hot, so developing a feel for the working temperature range on flat scrap first is time well spent.
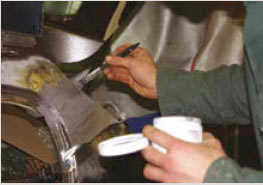
Apply tinning paste generously over the prepared area with a brush, covering the whole area where lead will be applied and a little beyond. Apply gentle heat over the paste using the torch or hot air gun, moving constantly to avoid localised overheating. Watch the paste carefully. As the metal reaches temperature the paste will first bubble and steam as the flux activates, then darken, and finally spread and flow as the solder particles melt into the surface.

When you can see the solder flowing, remove the heat and wipe the area firmly with a clean cloth while still warm. This removes the burnt flux residue but leaves the thin bonded solder layer behind. After wiping, wash the area with clean water and dry it. The tinning paste contains acid flux which remains active after the heat treatment and will promote corrosion if left on the metal. The tinned surface should be a light silver colour across the whole prepared area. Any dark patches where the solder has not bonded indicate contamination and need to be stripped back to bare metal and re-tinned.
Applying the lead
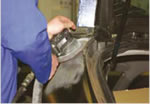
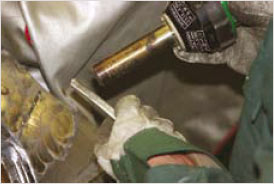
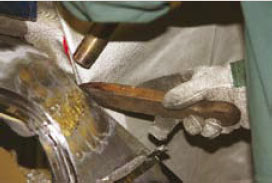
With the surface properly tinned you are ready to apply the body solder. Apply heat to the end of the lead stick, moving the torch across the panel at the same time to keep the tinned surface warm. The aim is to get both the stick and the panel to the right temperature simultaneously. When the stick starts to soften, press it firmly against the panel and twist slightly to break off a blob of semi-molten lead onto the surface.
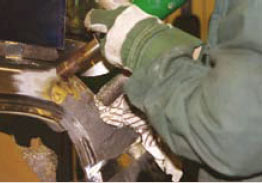
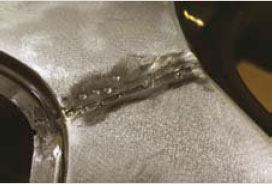
Work along the area depositing blobs of lead at intervals, building up a series of deposits across the repair area. Do not try to flow large amounts of lead at once. Once a series of blobs have been deposited, apply gentle heat to the panel surface to bring all the deposits into the pasty range together, then work them with a wooden paddle dipped in tallow.
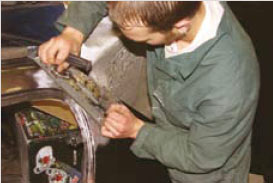
The tallow prevents the lead from sticking to the paddle. Use the paddle to push and spread the softening lead along the seam and into any crevices, building up the surface to slightly proud of the surrounding metal. The lead should feel like stiff putty at this stage, thick and workable rather than runny. If it starts to run and drip the heat is too high. Move the heat source away and let the surface cool slightly before continuing.
Vertical panels require particular care because the lead will run downward if it gets too hot. On a vertical C-post or door pillar, work in small sections and keep the heat moving. It is better to build up a vertical repair in two or three applications, allowing the lead to cool and solidify between passes, than to try to do it all in one go and end up with most of the material on the floor.
Shaping and finishing
Once the lead has cooled completely it can be filed and shaped. This is where the most important safety precaution applies: never use power tools to sand or grind lead. A disc sander or angle grinder will fling lead dust across the whole work area and into the air. Always file and shape by hand only.
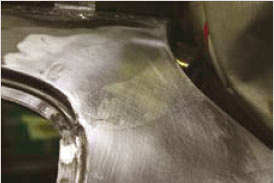
A body file used with moderate pressure will cut back the lead smoothly. Work diagonally across the repair rather than straight along it, which helps to reveal high and low spots. If the file cuts grooves in the lead or skips across it unevenly, the lead has hardened too much in that area and can be gently reheated to soften it slightly. As the lead approaches flush with the surrounding metal, switch to coarse wet and dry paper used with a flat sanding block to bring the surface to the final profile.
Any lead shavings and filings that fall can be collected and reused. A strip of aluminium tape folded into a channel and stuck to the panel below the repair area will catch most of the material as it falls. It will probably take two or three applications and sandings to get the surface perfectly smooth, but the result when done properly is a repair that is genuinely invisible and blends seamlessly with the surrounding metal.
When the surface is smooth and flush, wash the area again with soapy water to remove any remaining flux residue. Dry thoroughly and then wipe with a solvent cleaner to remove any tallow residue from the wooden paddle. Both flux and tallow must be completely removed before painting. Flux in particular will remain chemically active and cause paint adhesion problems and corrosion if left behind.
Common problems and how to avoid them
Lead not bonding to the panel
This is almost always a preparation or tinning failure. Either the metal was not clean enough before tinning, the tinning paste did not fully melt and flow across the whole surface, or the tinned surface was contaminated after washing. Strip the area back to bare metal, clean it again, and re-tin. Do not try to apply more lead over a poorly bonded area. It will not improve the situation.
Lead running and dripping
The heat is too high. The lead is going liquid rather than staying in the workable pasty range. Remove the heat, let the area cool, and try again with less heat. On a vertical panel this mistake usually deposits a significant amount of lead on the floor, which is both wasteful and a clear sign that more practice on flat scrap is needed before returning to the car.
Lead cracking after it has cooled
Cracking usually indicates that the lead was overworked with the paddle when it had already cooled below its working range, or that the panel flexed while the lead was setting. Ensure the panel is supported while the lead cools and do not continue working the paddle once the lead has stiffened significantly. If cracking occurs reheat the area gently to resoften and re-work the lead before it cools again.
Pinholes and porosity in the finished surface
Small pinholes in the finished lead surface indicate that gas was trapped during application. This sometimes happens if the flux was not fully cleaned from the surface before the main lead application, or if the heat was applied too quickly. Minor porosity can usually be filled with a subsequent small application of lead. More extensive porosity requires stripping the area back and starting again.
Is lead loading still relevant?
Some restorers take the view that since plastic filler has improved enormously, lead loading is an unnecessary complication that belongs in the past. There is something to this argument for general bodywork, and nobody should feel obliged to use lead where filler would do the job equally well. But for a proper show quality restoration of a car that originally left the factory with lead in its seams, filling those same seams with polyester filler is a compromise that will be visible to a knowledgeable judge and may not last as well over time. Lead, done properly, is the correct material for the job it was designed for. The factory knew what they were doing.
This page contains affiliate links. If you click a link and make a purchase, Classic Car Hub may earn a small commission at no extra cost to you.