The starter motor is one of those components that classic car owners rarely think about until it stops working, usually at the worst possible moment. The good news is that a starter motor on a classic British car almost never fails without giving you some warning first. Slow cranking, intermittent operation, a jammed Bendix gear, these are all signs that something needs attention. Learn to recognise them early and you will almost certainly avoid the cold wet evening when the car refuses to start outside a pub two counties from home.
How the starter motor works
The starter motor on most classic British cars from the 1950s through to the 1970s is a relatively simple pre-engaged or inertia type unit. When the ignition key is turned to the start position, current flows to the solenoid, which does two jobs simultaneously: it pushes the Bendix pinion gear forward along the armature shaft to engage with the ring gear on the flywheel, and it closes the heavy duty contacts that allow the main starting current to flow through the motor. The motor spins, the pinion drives the flywheel, the engine turns over. When the engine fires and the key is released, the Bendix spring retracts the pinion clear of the ring gear before the now-running engine can spin the starter motor to destruction.
The solenoid on most classic car starters is mounted directly on top of the motor body and is an integral part of the unit. On some earlier cars a separate starter switch on the dashboard or floor operates the solenoid remotely. Both arrangements are simple and reliable, but the solenoid is statistically more likely to cause problems than the motor itself, which is worth remembering when fault finding.
Warning signs to watch for
A starter motor on its way out usually gives you several opportunities to notice something is wrong before it fails completely.
Slow cranking
If the engine is turning over more slowly than usual when you try to start it, the first thing to check is the battery. A partially discharged or failing battery is by far the most common cause. However if the battery is fully charged and the engine still cranks slowly, the problem is likely a poor earth connection or failing brushes inside the starter. Do not ignore slow cranking. It will get slower.
Intermittent operation
A starter that works perfectly on some occasions and refuses to engage on others is often pointing to a worn or dirty commutator, sticking brushes, or a solenoid with worn or pitted contacts. On older cars the solenoid contacts are a serviceable item and can be cleaned or replaced without renewing the whole unit. This is worth investigating before condemning the starter motor.
A single dull clunk
If you turn the key and hear nothing more than a single heavy clunk, the most likely cause is a jammed Bendix gear. The pinion has engaged with the ring gear but the motor cannot turn because the teeth are locked. This is a common fault on cars that have been standing, or on starters where the Bendix spring is weakening and the pinion is not retracting cleanly after each start.
There is a well known temporary fix for a jammed Bendix that will usually get you home. Turn off the ignition, put the car in fourth gear, release the handbrake, and rock the car backwards and forwards several times. The rocking action rotates the flywheel slightly, which is usually enough to free the locked teeth. Put the handbrake back on, take the car out of gear, and try again. You may need to repeat this two or three times. It is a temporary measure only. The Bendix assembly, the starter motor, or the ring gear will need proper attention to cure the problem.
The earth strap: a frequently missed culprit
One of the most instructive starter motor fault stories involves a friend who spent considerable time and some anxiety trying to diagnose why his classic was cranking very slowly and refusing to start. The battery was fully charged. The connections all checked out visually. Even a multimeter showed everything reading as it should. The engine continued to turn over reluctantly and eventually, after several attempts, a smell of burning prompted a look under the bonnet. Smoke was coming from the cable operating the heater valve.
The explanation was the earth strap. It was still physically bolted to both the engine and the body but the mating surfaces had corroded to the point where it was no longer making a proper electrical connection. The engine was earthing itself through the heater valve cable instead, which is an entirely inadequate conductor for the current a starter motor demands. The multimeter had given a false reading because the circuit was technically complete, just not capable of carrying the load. The heater cable was overheating, the starter was starved of current, and the engine would not start.
This fault is remarkably common on older classics and remarkably easy to overlook. If a starter is cranking slowly and all the obvious checks have been done, remove the earth strap, clean both mating surfaces back to bare metal, and refit it. It costs nothing and has been the solution to many a mysterious starting problem.
Removing and dismantling the starter motor
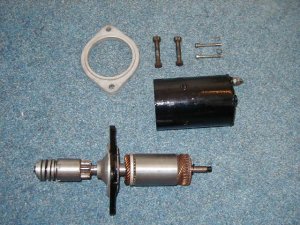
On most classic British cars removing the starter motor is a straightforward job. There are typically only two or three bolts securing it to the bell housing and two electrical connections, the main heavy feed from the battery and the smaller trigger wire to the solenoid. Label these before disconnecting them if there is any possibility of confusion on reassembly.
Access varies considerably between models. On some cars the starter is easily reached from above, on others it requires working from underneath with the car raised on stands. Consult the workshop manual for your specific car before starting, as the procedure and access arrangements differ significantly even between cars from the same manufacturer.
Once on the bench the starter can be dismantled for inspection. Two important rules apply before you start cleaning. First, do not submerge the unit in cleaning solvent. The windings inside the motor will absorb solvent carrying carbon and copper dust into the electrical insulation, which causes short circuits. Second, do not use a pressure washer. The same problem applies. Use compressed air with appropriate eye and dust protection, or a clean lint-free cloth barely dampened with cleaning fluid, to remove dirt from the internal components.
Checking the Bendix assembly
With the motor dismantled, inspect the Bendix pinion teeth for wear and chipping. Any tooth that is significantly worn, rounded, or chipped should be compared with the condition of the ring gear on the flywheel, as the two usually wear together. A new Bendix on a badly worn ring gear is a false economy. Check the Bendix spring for tension and the pinion for free movement along the shaft. The spring should be firm and the pinion should slide smoothly without sticking. The Bendix assembly can usually be replaced as a sub-unit if required.
Brushes and commutator
The carbon brushes are the most commonly worn consumable in the starter motor. Check their length against the specification in the workshop manual. Brushes worn below the minimum length will not maintain adequate contact pressure against the commutator and the motor will either crank slowly or fail to operate altogether. Replacing the brushes involves unsoldering the brush wire from its holder and soldering the new one in place. This is straightforward work with a decent soldering iron and some basic competence at soldering. If you are not confident doing this, an auto electrician will do it quickly and cheaply, or an exchange unit can be obtained.
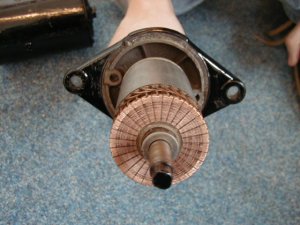
The commutator, the copper segmented drum that the brushes bear against, should be clean and smooth with a light polished surface. A dirty commutator can be cleaned with a cloth dampened in contact cleaner. Light scoring can be polished out with very fine wet and dry paper used carefully, keeping the copper segments clean and the insulation between them undamaged. Do not undercut the insulation between the copper segments under any circumstances. Heavy scoring or deep grooving means the commutator needs to be skimmed on a lathe, which requires specialist equipment. At that point an exchange unit is usually the more sensible option.
Shaft bushes and end plates
The armature shaft runs in bushes pressed into the front and rear end plates of the motor. Check these for wear by rocking the armature shaft gently from side to side. Any perceptible play indicates a worn bush. Replacement bushes are available for most classic car starters and pressing them in requires only a suitable drift and a vice. A worn bush allows the armature to run off-centre, which accelerates brush and commutator wear and can cause the armature windings to foul the field coils.
Field coils and windings
Inspect the field coil windings for any signs of scorching, blackening, or damaged insulation. Light surface oxidation is not a problem but any area showing heat damage or exposed copper conductor indicates a fault that will cause the motor to underperform or fail. If the windings show significant damage the motor will need rewinding or replacing.
Bench testing before refitting
Before refitting the starter to the car it is well worth bench testing it. Clamp the motor body securely in a vice and connect jump leads directly to it, one lead to the main terminal and the other to the motor body or mounting bracket. Check the polarity carefully before connecting and make sure the jump leads and their clamps are in good condition. Apply current briefly and the motor should spin freely at high speed. Watch that the Bendix pinion moves forward along the shaft on engagement and retracts cleanly when current is removed. A motor that passes this test on the bench can be refitted with reasonable confidence. One that does not has saved you the frustration of refitting and removing it again.
Solenoid servicing
The solenoid is more likely to cause problems than the motor itself on most classic car starters. The main contacts inside the solenoid carry the full starting current and over time they burn and pit, increasing resistance and reducing the current available to the motor. On many classic car solenoids the contact assembly can be dismantled and the contacts cleaned or reversed to present a fresh face, or new contact discs can be fitted. This is a worthwhile service job on any solenoid that is showing signs of intermittent operation or slow cranking where the motor itself checks out as sound.
Starter motor fault finding guide
Starter motor fails to turn the engine
| Cause | Trouble | Solution |
|---|---|---|
| No electricity at starter motor | Battery discharged | Charge battery |
| Battery defective | Renew battery | |
| Battery terminals loose or earth lead not secure | Check and clean all connections | |
| Starter switch or solenoid faulty | Test and replace components | |
| Electricity reaching starter motor | Bendix pinion jammed with flywheel ring gear | Put in gear and rock car to free |
| Starter brushes badly worn or brush wires loose | Replace brushes | |
| Commutator dirty, worn or burnt | Clean or skim commutator | |
| Starter motor armature faulty | Replace starter motor | |
| Field coils earthed or damaged | Replace starter motor |
Starter motor turns very slowly
| Cause | Trouble | Solution |
|---|---|---|
| Electrical problems | Battery in discharged condition | Charge battery |
| Starter brushes badly worn or brush wires loose | Replace brushes | |
| Loose wires in starter motor circuit | Check wiring and tighten all connections | |
| Bad earth connection between body and engine | Remove, clean and refit earth strap |
Starter motor noisy or rough when engaging
| Cause | Trouble | Solution |
|---|---|---|
| Mechanical damage | Bendix pinion or flywheel ring gear teeth broken or worn | Replace starter and inspect ring gear |
| Starter motor main spring broken | Replace starter motor | |
| Starter motor retaining bolts loose | Tighten retaining bolts |
Exchange units versus a full rebuild
For most classic car owners the choice when a starter motor needs attention comes down to a home rebuild, an exchange unit from a specialist, or a new old stock unit if one can be found. Home rebuilding is entirely feasible on most classic car starters if the motor body, field coils and armature are sound and the work required is limited to brushes, bushes and commutator cleaning. The parts are generally available and the job is well within the ability of anyone comfortable with basic electrical work and a soldering iron.
If the armature or field coils are damaged, an exchange unit is usually the more practical route. Exchange starters are available for most common British classics from the usual specialists and are considerably cheaper than buying a new unit outright. When fitting an exchange unit, clean the mating face on the bell housing before refitting and make sure the earth strap and all connections are in good condition while the starter is out. It would be a shame to fit a perfectly good starter motor only to have it perform poorly because of a corroded earth connection.
This page contains affiliate links. If you click a link and make a purchase, Classic Car Hub may earn a small commission at no extra cost to you.