If your classic car’s battery is going flat overnight, your lights are running dim, or your ammeter is showing a permanent discharge even with the engine running, the voltage regulator is one of the first things to investigate. It is a component that most classic car owners have heard of but relatively few fully understand, which is a shame because the principles behind it are straightforward and the ability to test and adjust one is a genuinely useful skill. This guide covers what the voltage regulator does, the different types you are likely to encounter, how to test one, and how to adjust it.
What the voltage regulator does
The charging system on a classic car has one fundamental job: keep the battery charged. The complication is that the output of a dynamo or alternator varies enormously with engine speed. At idle the output is modest. At motorway speeds the same unit could produce far more voltage than the battery or electrical system can safely accept. Without regulation, high engine speeds would overcharge and damage the battery, and the increased voltage would shorten the life of every bulb on the car.
The voltage regulator sits between the generator and the battery and acts as the gatekeeper, varying the generator’s output to maintain a steady charging voltage regardless of engine speed. When the output tries to rise above the set voltage, the regulator reduces the field current in the generator, which reduces output. When speed drops and output falls, the regulator increases field current again. The result is a roughly constant voltage reaching the battery across a wide range of engine speeds.
Dynamo cars and the Lucas control box
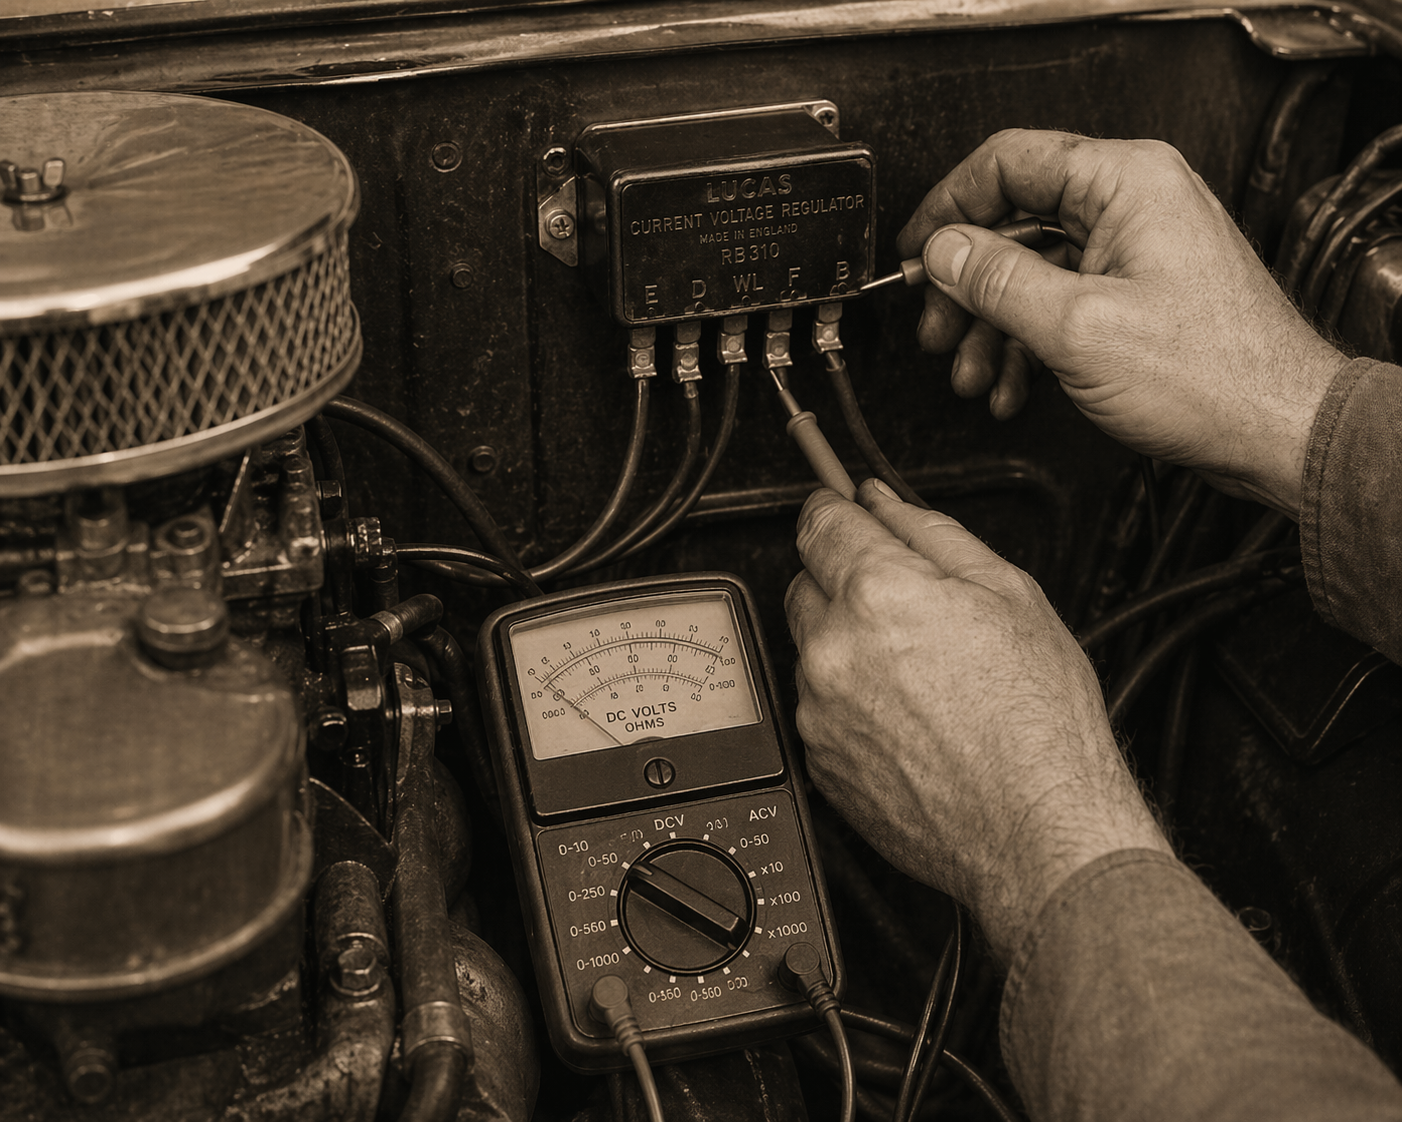
Cars built before the late 1960s typically used a dynamo rather than an alternator for charging. The dynamo is a DC generator driven from the engine by a belt, and it requires a separate control box to manage its output. On British cars of this era the control box is almost invariably a Lucas unit, typically the RB106, RB340 or similar, a small black metal box bolted to the inner wing or bulkhead with three terminals and, inside, three distinct units that work together.
The three units inside the control box
Opening a Lucas control box reveals three separate electromagnetic units mounted on a common base. Understanding what each one does is important before attempting any adjustment.
The voltage regulator is the unit you are most likely to need to adjust. It monitors the system voltage and controls the field current to the dynamo to maintain the correct output. When voltage reaches the set point, the regulator contacts open, a resistor is introduced into the field circuit, output drops, and the contacts close again. This cycle happens many times per second and produces the regulated output.
The current regulator limits the maximum current the dynamo can produce, protecting the dynamo from overload during heavy electrical demand or at high speeds with a discharged battery. It works on the same contact and resistor principle as the voltage regulator but responds to current rather than voltage. Most owners never need to touch this one.
The cut-out relay is perhaps the most elegant of the three. Its job is to connect the dynamo to the battery when the dynamo is producing sufficient voltage to charge, and to disconnect it when the engine slows or stops. Without the cut-out, a stationary car would drain its battery through the dynamo windings overnight. The cut-out closes automatically when dynamo output exceeds battery voltage by a small margin, and opens again when the dynamo output falls below battery voltage. A cut-out that fails to open can drain a battery very quickly and is sometimes mistaken for a battery fault.
Alternator cars: a different approach
From the late 1960s onwards, most British cars moved to alternators rather than dynamos. The alternator produces AC current which is rectified internally to DC, and it has several advantages over the dynamo including higher output at low engine speeds and a simpler overall system. Crucially for this discussion, alternators incorporate their voltage regulator internally as a solid-state electronic unit rather than using an external control box.
The internal regulator on a classic car alternator, typically a Lucas ACR series unit on British cars, is not adjustable. It is either working correctly or it is not. If an alternator is not charging, the regulator can be replaced as a separate component on many units, which is considerably cheaper than replacing the whole alternator. If the charging voltage is consistently outside the normal range on an alternator-equipped car, either the regulator has failed or there is a wiring or connection problem in the charging circuit.
What voltage should you be seeing?
Before testing or adjusting anything, it helps to know what a correctly functioning charging system should produce. The correct charging voltage for most classic British cars is between 13.9 and 14.7 volts measured at the battery with the engine running at a fast idle, typically around 2,000rpm. The exact figure varies slightly with ambient temperature as the optimal charging voltage for a lead acid battery is temperature dependent, but 14.2 to 14.4 volts is a reasonable target for normal UK conditions.
A reading below 13.5 volts indicates undercharging. Over time the battery will discharge and the car will eventually fail to start. A reading consistently above 15 volts indicates overcharging, which will cause the battery to gas and lose electrolyte, shorten battery life significantly, and may damage other electrical components. Both conditions need addressing.
Testing the charging system
A basic digital multimeter is all you need to test the charging system. Connect the meter across the battery terminals, positive to positive and negative to negative, before starting the engine. A fully charged battery at rest should read around 12.6 volts. Note this figure.
Start the engine and allow it to idle for a minute, then increase revs to approximately 2,000rpm. Watch the voltmeter reading. It should rise from the battery resting voltage to the charging voltage and stabilise in the 13.9 to 14.7 volt range. If it does not rise above the battery resting voltage, the charging system is not working. If it rises but stays below 13.9 volts, the system is undercharging. If it rises above 15 volts and keeps climbing, the regulator is not controlling output correctly.
Before condemning the voltage regulator on a dynamo car, check the obvious causes of poor charging. The dynamo drive belt should be correctly tensioned, neither slack nor excessively tight. The connections at the control box should be clean and tight, as high resistance connections causes incorrect readings and erratic regulation. The dynamo brushes may be worn, producing reduced output regardless of regulator condition. Test the dynamo output directly at its output terminal before assuming the control box is at fault.
[ebay_placement]
Adjusting the Lucas voltage regulator
Adjusting the voltage regulator on a Lucas control box is one of those jobs that seems daunting the first time and straightforward every time after that. The adjustment changes the spring tension on the regulator armature, which alters the voltage at which the contacts open. More spring tension means higher voltage before the contacts open, which raises the regulated output. Less tension means the contacts open at a lower voltage, reducing output.
Before opening the control box, make sure the car’s electrical system has been running for at least fifteen minutes to allow everything to reach operating temperature. Voltage regulators are temperature sensitive and a cold adjustment will not reflect the operating condition accurately.
The adjustment procedure
Remove the control box cover carefully. Inside you will see the three electromagnetic units. The voltage regulator is typically the unit nearest the terminal block. It has a small armature with a contact point on its underside that bears against a fixed contact below it, and a spring that holds the armature down. The spring tension is adjusted by bending a small flat spring or turning an adjusting screw depending on the specific unit. On most Lucas boxes it is a bending adjustment on the spring arm.
Have a helper watch the voltmeter while you make adjustments, or use a length of wire to bring the voltmeter where you can see it while working. With the engine running at 2,000rpm, observe the voltage reading. If adjustment is needed, use a small screwdriver or a proper regulator adjusting tool to carefully bend the regulator spring arm. Bending it downward increases spring tension and raises the regulated voltage. Bending it upward reduces tension and lowers the voltage. Make very small adjustments, half a millimetre at a time, and allow the reading to stabilise after each adjustment before making the next one.
The goal is a stable reading in the 13.9 to 14.4 volt range at 2,000rpm with the lights and other loads switched off. Once achieved, switch on the headlights and check that the voltage drops only slightly, perhaps 0.2 to 0.3 volts, under the additional load. A much larger drop under load suggests the dynamo output is marginal and the dynamo itself needs attention.
Once the adjustment is correct, replace the control box cover and recheck the voltage after a full run to confirm the setting has held. Regulators that have been disturbed can sometimes settle slightly over the first few miles.
A note on the contact points
While the control box is open, inspect the contact points on the voltage regulator and current regulator. They should be clean and have a light grey or slightly burnished appearance. Pitted, burnt or dirty contacts can cause erratic regulation even when the spring tension is correctly set. Light pitting can be dressed with a fine points file or a strip of very fine wet and dry paper drawn carefully between the closed contacts. Do not use emery cloth as this leaves abrasive particles that causes accelerated wear. Deeply pitted or burnt contacts mean the unit needs replacing.
Electronic replacement regulators
For dynamo-equipped classics it is worth knowing that electronic replacement voltage regulators are available that fit in place of the original Lucas control box. These solid-state units require no adjustment, maintain a more accurate regulated voltage than a worn mechanical unit, and are generally more reliable in the long term. They are not universally loved by purists who prefer to keep the car original, but for a car used regularly they are a practical solution that removes one source of potential charging problems entirely.
If fitting an electronic replacement, follow the manufacturer’s instructions carefully as the wiring connections may differ slightly from the original Lucas box. The cut-out relay function is incorporated into most electronic replacement units and does not need to be replicated separately.
Common symptoms and causes
| Symptom | Likely cause | Action |
|---|---|---|
| Battery goes flat overnight | Cut-out relay not opening, or battery drain from elsewhere | Disconnect dynamo lead at night to confirm, then check cut-out |
| Charging voltage below 13.5V | Regulator set too low, worn dynamo brushes, slack belt, poor connections | Check belt and connections first, then test dynamo output directly |
| Charging voltage above 15V | Voltage regulator contacts stuck closed or spring tension too high | Check and clean contacts, readjust spring tension |
| Ammeter shows discharge at all times | Cut-out not closing, broken dynamo belt, failed dynamo | Check belt first, then test dynamo output |
| Ammeter fluctuates erratically | Dirty or pitted regulator contacts, poor earth connection | Clean contacts and check all earths in the charging circuit |
| Battery using excessive water | Overcharging, voltage set too high | Check charging voltage, adjust regulator if above 14.7V |
| Lights dim at idle, bright at speed | Normal on dynamo cars with modest output at low revs — consider electronic upgrade | Check dynamo output, consider electronic regulator replacement |
Earthing: the most overlooked factor
No article on classic car charging systems is complete without mentioning earthing. The entire charging system depends on good earth connections throughout the car. A poor earth between the engine and the body, between the battery negative terminal and the chassis, or at the control box itself can cause every symptom described above while the regulator itself is in perfect condition. Before spending time adjusting the regulator on a car with charging problems, remove, clean, and refit every earth connection in the charging circuit. It costs nothing and is responsible for a remarkable proportion of charging system faults on cars of this age.
This page contains affiliate links. If you click a link and make a purchase, Classic Car Hub may earn a small commission at no extra cost to you.