
A proper respray on a classic car can cost serious money. Even a modest single colour car through a reputable bodyshop can set you back several thousand pounds, and a full rotisserie restoration paint job on something worth preserving properly can run into five figures without difficulty. Which makes it all the more worthwhile to look after what you have, and to address cosmetic problems before they become structural ones. A stone chip ignored for a season becomes a rust spot. A rust spot ignored for a year becomes a repair job. This guide covers everything from washing and polishing through to cutting compounds, paint chip repair, and when to admit that professional help is the right answer.
Assessing the condition of your paintwork
Before doing anything to the paint, assess what you are actually dealing with. Classic car paintwork fails in several distinct ways and the treatment for each is different. Getting this wrong wastes time and can make things worse.
Run your hand over the surface of the paint in good light. Sound paint feels smooth and has a consistent surface texture. Faded or oxidised paint feels slightly rough or chalky, particularly on horizontal surfaces that receive the most UV exposure. Look along the panels from a low angle, which reveals surface scratches and swirl marks that are invisible when viewed straight on. Check for any areas where the paint has lifted, bubbled, or cracked, as these indicate moisture has reached the metal underneath and the problem is now structural rather than cosmetic. Check carefully around any badges, trim clips, or areas where water can sit.
The critical question is how much paint is left. Every abrasive treatment removes a small amount of paint. A car with thick, well-preserved original paint can withstand repeated polishing and compounding over many years. A car that has been heavily polished previously, or that has very thin paint from a cheap respray, may have very little left to work with. If in doubt, a paint depth gauge will give you a reading in microns across each panel. Anything below 80 microns should be treated with extreme caution when using abrasives.
Washing: the foundation of everything
Every paintwork treatment begins with a proper wash, and a proper wash is not the same as a quick once-over with a bucket of washing up liquid. Washing up liquid strips the protective wax from paint, and while this is sometimes intentional before polishing, it is not something you want happening every time you wash the car. Use a dedicated car shampoo, applied with a clean wash mitt or a large soft sponge.
Rinse the car thoroughly before touching it with the wash mitt. Any grit on the surface will be dragged across the paint by the mitt and cause scratching. Start at the top of the car and work downward, since the lower panels are the dirtiest and you do not want to transfer that dirt to the upper panels. Rinse each section before moving to the next so the shampoo does not dry on the surface. Pay particular attention to the wheel arches, sills, and the area around the front bumper where road tar and insect residue accumulates.
Dry the car with a chamois or a quality microfibre drying towel rather than leaving it to air dry, which causes water spots particularly in hard water areas. Wring out the chamois regularly as you work to prevent streaking. Once dry, inspect the surface under good light for any tar spots, tree sap, or insect residue that washing has not removed. A dedicated tar remover will deal with these without damaging the paint. Do not try to pick them off mechanically as this will cause scratches.
Faded and oxidised paint
Oxidation is what happens when UV light and atmospheric oxygen attack the surface of the paint over time. The top layer of paint loses its protective oils and begins to break down, producing a chalky, dull surface that has lost its depth and gloss. On cellulose paint, which is what most British classics left the factory with, oxidation is particularly common because the paint is softer and more vulnerable than modern two-pack finishes.
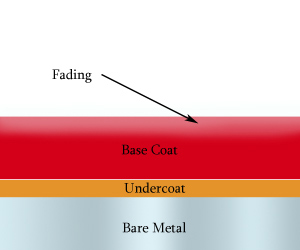
Fading occurs when UV light attacks the base coat, bleaching the colour from the surface downward. How deep the fading has penetrated determines whether polishing will restore the colour or whether repainting is the only option.
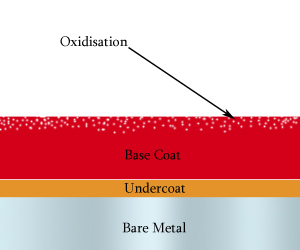
Oxidisation breaks down the surface of the paint at a molecular level, producing the characteristic chalky, rough texture. The oxidised layer can often be removed with a cutting compound to reveal sound paint beneath, provided enough thickness remains.
The good news is that on a car where the oxidation is surface-level and the underlying paint is sound, the original colour and gloss can often be substantially restored. The process involves removing the oxidised surface layer to reveal the better paint underneath. How aggressively you need to work depends on how far the oxidation has penetrated.
For light oxidation and general dullness, a good quality polish with mild abrasive content is often sufficient. Products such as T-Cut Original, which was specifically formulated for cellulose paintwork and has been around long enough that its probably older than your car, are designed exactly for this purpose. Apply to a small area at a time with a clean soft cloth, working in straight back and forth strokes rather than circular ones which can leave swirl marks. Remove before it dries completely and inspect the surface. Repeat if necessary.
For more heavily oxidised paint, a rubbing compound with coarser abrasive content is needed before polishing. Apply the compound by hand using a foam or cloth applicator, working in a two-foot square area at a time. This is laborious work and it requires patience rather than enthusiasm. Rushing a rubbing compound job, pressing too hard or working too fast, risks cutting through to primer or bare metal on thin paint, particularly on edges, corners and raised body lines which always have less paint than flat surfaces. Apply masking tape to these vulnerable areas before compounding and address them separately by hand with a lighter touch.
Metallic paint: a specific warning
Metallic paint requires a different approach. The metallic flakes in the paint sit in specific orientations that give the finish its characteristic shimmer. Abrasive compounds disturb these flakes and can leave a flat, dull patch that looks worse than the original oxidation. If your classic has metallic paint, avoid abrasive compounds entirely and use only a non-abrasive polish designed specifically for metallic finishes. Most classic cars left the factory in solid colours, but those that were resprayed at some point may well have metallic paint over the original solid colour.
[ebay_placement]
Machine polishing
A dual action polishing machine removes compound and polish from the surface far faster than working by hand, and produces a more consistent result across large flat panels. It is genuinely useful on a car with extensive oxidation where hand polishing would take days. However it also removes paint faster than hand polishing, and on thin or fragile paintwork that speed becomes a liability. If you are using a machine polisher for the first time, practice on a less visible panel first and keep the machine moving constantly. Holding it stationary on one spot for even a few seconds generates enough heat to burn through paint.
Start with the least aggressive pad and compound combination that achieves a result and work up from there if needed, rather than starting with the most aggressive option and discovering you have taken too much off. After any machine polishing, inspect the paint carefully in good light and by touch before moving to the next stage.
Stone chips and paint chip repair
Stone chips are the most common paintwork damage on any classic used on the road, and they are also the most important to address promptly. A chip that exposes bare metal will begin to rust within weeks in the British climate, and once rust starts under the paint it spreads laterally under the surrounding paint surface in a way that is not visible until the paint begins to lift. What looks like a small chip can become a much larger rust patch surprisingly quickly.
Finding the right colour
Before buying touch-up paint, make sure you have the correct colour for your specific car. Classic car colours varied between production batches and have aged differently on individual cars over fifty-plus years, which means a generic paint described as “Signal Red” or “British Racing Green” may not match your car’s actual current colour. See our paint code guides for MG and Triumph models for details on how to find the correct factory code for your car. Once you have the code, order from a specialist supplier who can mix to the original formula rather than using a generic aerosol from a motor factor.
Touch-up pen and brush application
For small chips up to a few millimetres across, a touch-up brush or fine-tipped touch-up pen is the right tool. Clean the chip thoroughly with a cotton bud dipped in panel wipe or isopropyl alcohol to remove any wax, oil or loose paint from inside the chip. Allow to dry completely. If the chip has already begun to rust, treat it with a rust converter product and allow that to fully cure before applying paint.
Apply the touch-up paint in thin layers rather than one thick application. A thick application will shrink as it dries, leaving a visible crater, and will take much longer to harden properly. Apply a thin coat, allow to dry for the time specified on the product, then apply another thin coat if needed. Build up the paint to slightly above the surrounding surface level to allow for a small amount of shrinkage as it fully cures over the following weeks.
Once the paint has fully cured, which on cellulose touch-up products can take several weeks rather than days, the repaired area can be carefully flattened with very fine wet and dry paper used wet, and then polished back to a shine. On older, slightly faded paint the fresh touch-up will initially look brighter than the surrounding surface. This is normal and will tone down as the paint ages, or can be addressed with a light application of cutting polish to the surrounding area to bring it into closer match.
Larger chips and deeper damage
Chips that have penetrated through the paint to primer or bare metal, or that are larger than a few millimetres, need more careful attention. Apply a thin coat of primer to any exposed metal before the colour coat, allow it to dry fully, and then apply the colour in the same thin layer approach described above. On deeper chips a small amount of stopper or spot filler can be used to build up the level before painting, sanded smooth once dry.
Chips that have already rusted need the rust removed or converted before any paint is applied. A rust converter will chemically stabilise light surface rust, turning it from active iron oxide into a stable compound that paint will adhere to. For deeper rust pitting the loose rust should be mechanically removed as far as possible before treatment. Paint applied over active rust will lift within months regardless of how carefully it is applied.
Scratches
Scratches fall into two categories and the distinction matters. Surface scratches that have only affected the top layer of paint can often be polished out entirely. Scratches that have cut through to primer or metal cannot be polished out and need touch-up paint treatment as described above.
Surface scratches that have only penetrated the clear coat or top paint layer can often be polished out entirely. Scratches that reach the base coat or below require touch-up paint rather than polishing.
To test which type you have, clean the scratch thoroughly and look at it carefully in good light. A surface scratch has a white or light grey appearance as the abraded paint reflects light differently from the surrounding surface. It has not removed paint so much as disrupted the surface layer. A through-paint scratch shows a different colour underneath, either the grey of primer or the silver of bare metal.
Surface scratches can be addressed with a scratch remover product or a fine cutting polish. Products such as the Autoglym Scratch Removal Kit contain the appropriate abrasive content for this purpose and come with clear instructions. Work the product into the scratch with a clean cloth using moderate pressure and straight strokes. The abrasive cuts the surrounding paint down to the level of the scratch, removing the visible discontinuity. This works because a scratch is a groove and polishing the surrounding area down to the scratch floor makes the groove invisible, but it does remove a small amount of paint and should not be repeated more times than necessary.
Bird droppings and acid etching
Bird droppings are more damaging to paintwork than most people appreciate. The uric acid in fresh droppings is highly corrosive and can etch into paint within hours in warm weather. Remove them as quickly as possible, softening with a damp cloth rather than wiping dry which scratches the surface.
Acid etching from bird droppings or industrial fallout pits the surface of the clear coat. Light etching can be polished out. Deep etching that has penetrated through the clear coat requires professional attention or localised repainting.
Once removed, inspect the area for any etching of the paint surface. Light etching can be polished out. Deep etching that has left a visible pit or textured mark in the paint surface cannot be fully removed by polishing and may require professional attention or touching in with paint to reduce its visibility.
Waxing and protection
Waxing is the final step after any polishing or compounding work and should be part of regular maintenance regardless. A good coat of carnauba wax seals the paint surface, provides UV protection, and makes subsequent washing easier by preventing dirt from bonding directly to the paint. On cellulose paintwork in particular, which is softer and more porous than modern finishes, regular waxing makes a measurable difference to how well the paint holds up over time.
Apply wax to one panel at a time with a clean applicator, allow it to haze, and buff off with a clean microfibre cloth. Work in the shade, as wax applied in direct sunlight dries too quickly and becomes difficult to remove cleanly. Do not apply wax to any area that has been freshly polished with a compound until the panel has been thoroughly cleaned of all compound residue first, as compound and wax do not mix well and the result will be a streaky, difficult to remove mess.
Check that any wax you use does not contain abrasives. Some all-in-one polish and wax products contain both, which means they clean and protect simultaneously. These are convenient but they are removing a small amount of paint every time they are used. For regular maintenance use a pure wax over separately polished paint rather than an abrasive all-in-one product every time.
Chrome and brightwork
Classic car chrome requires separate treatment from the paintwork. Light tarnish and surface oxidation on chrome responds well to a dedicated chrome or metal polish. Apply sparingly with a soft cloth, buff to a shine, and then protect with a light coat of wax to slow subsequent tarnishing. Do not use paint polish on chrome as the abrasive content is too high and will leave fine scratches visible in the reflective surface.
Pitted or heavily corroded chrome cannot be restored by polishing. The chrome plating itself has been compromised and re-chroming by a specialist is the only proper solution. Heavily corroded chrome left in place will eventually begin to lift from the base metal underneath, and the resulting sharp edges can damage paintwork on adjacent panels.
When to call a professional
Home paintwork restoration has clear limits and it is worth knowing where they are before you discover them on the car. Any of the following require professional attention rather than another pass with the cutting compound.
Paint that is lifting or bubbling from the surface has moisture underneath it and is on its way to becoming a rust repair rather than a cosmetic one. Polishing over it will not help and will mask how quickly it is deteriorating. Any scratch or chip where rust has spread laterally under the surrounding paint needs professional attention to remove all the affected metal before repainting. Extensive stone chipping across large areas of a panel is better addressed by a professional respray of that panel than by attempting to touch in dozens of individual chips. And any paint that is too thin for further abrasive work needs either professional respray or very careful preservation of what remains.
The line between a cosmetic problem and a structural one is crossed when moisture reaches the metal. Keep the paint sound and that line stays comfortably distant. Let chips and scratches go unaddressed and the line has a habit of arriving much sooner than expected.